Variables
Last updated on
Let’s start your first TypeScript lesson with variables! Along the way, I’ll show you some tips and tricks for working with TypeScript, VS Code, and Node.js.
Note that I assume you’ve completed the Setup lesson before diving into this one.
Setup
Create a new, empty folder on your computer, open it with VS Code, and create a file named main.ts inside it.
Type this code in main.ts and save the file:
console.log("Hello!");Open the terminal (Command + J on Mac or Control + J on Windows) and run this command:
node --watch main.tsThis runs our code and automatically runs it again each time we save a change, so we can see the results as we work.
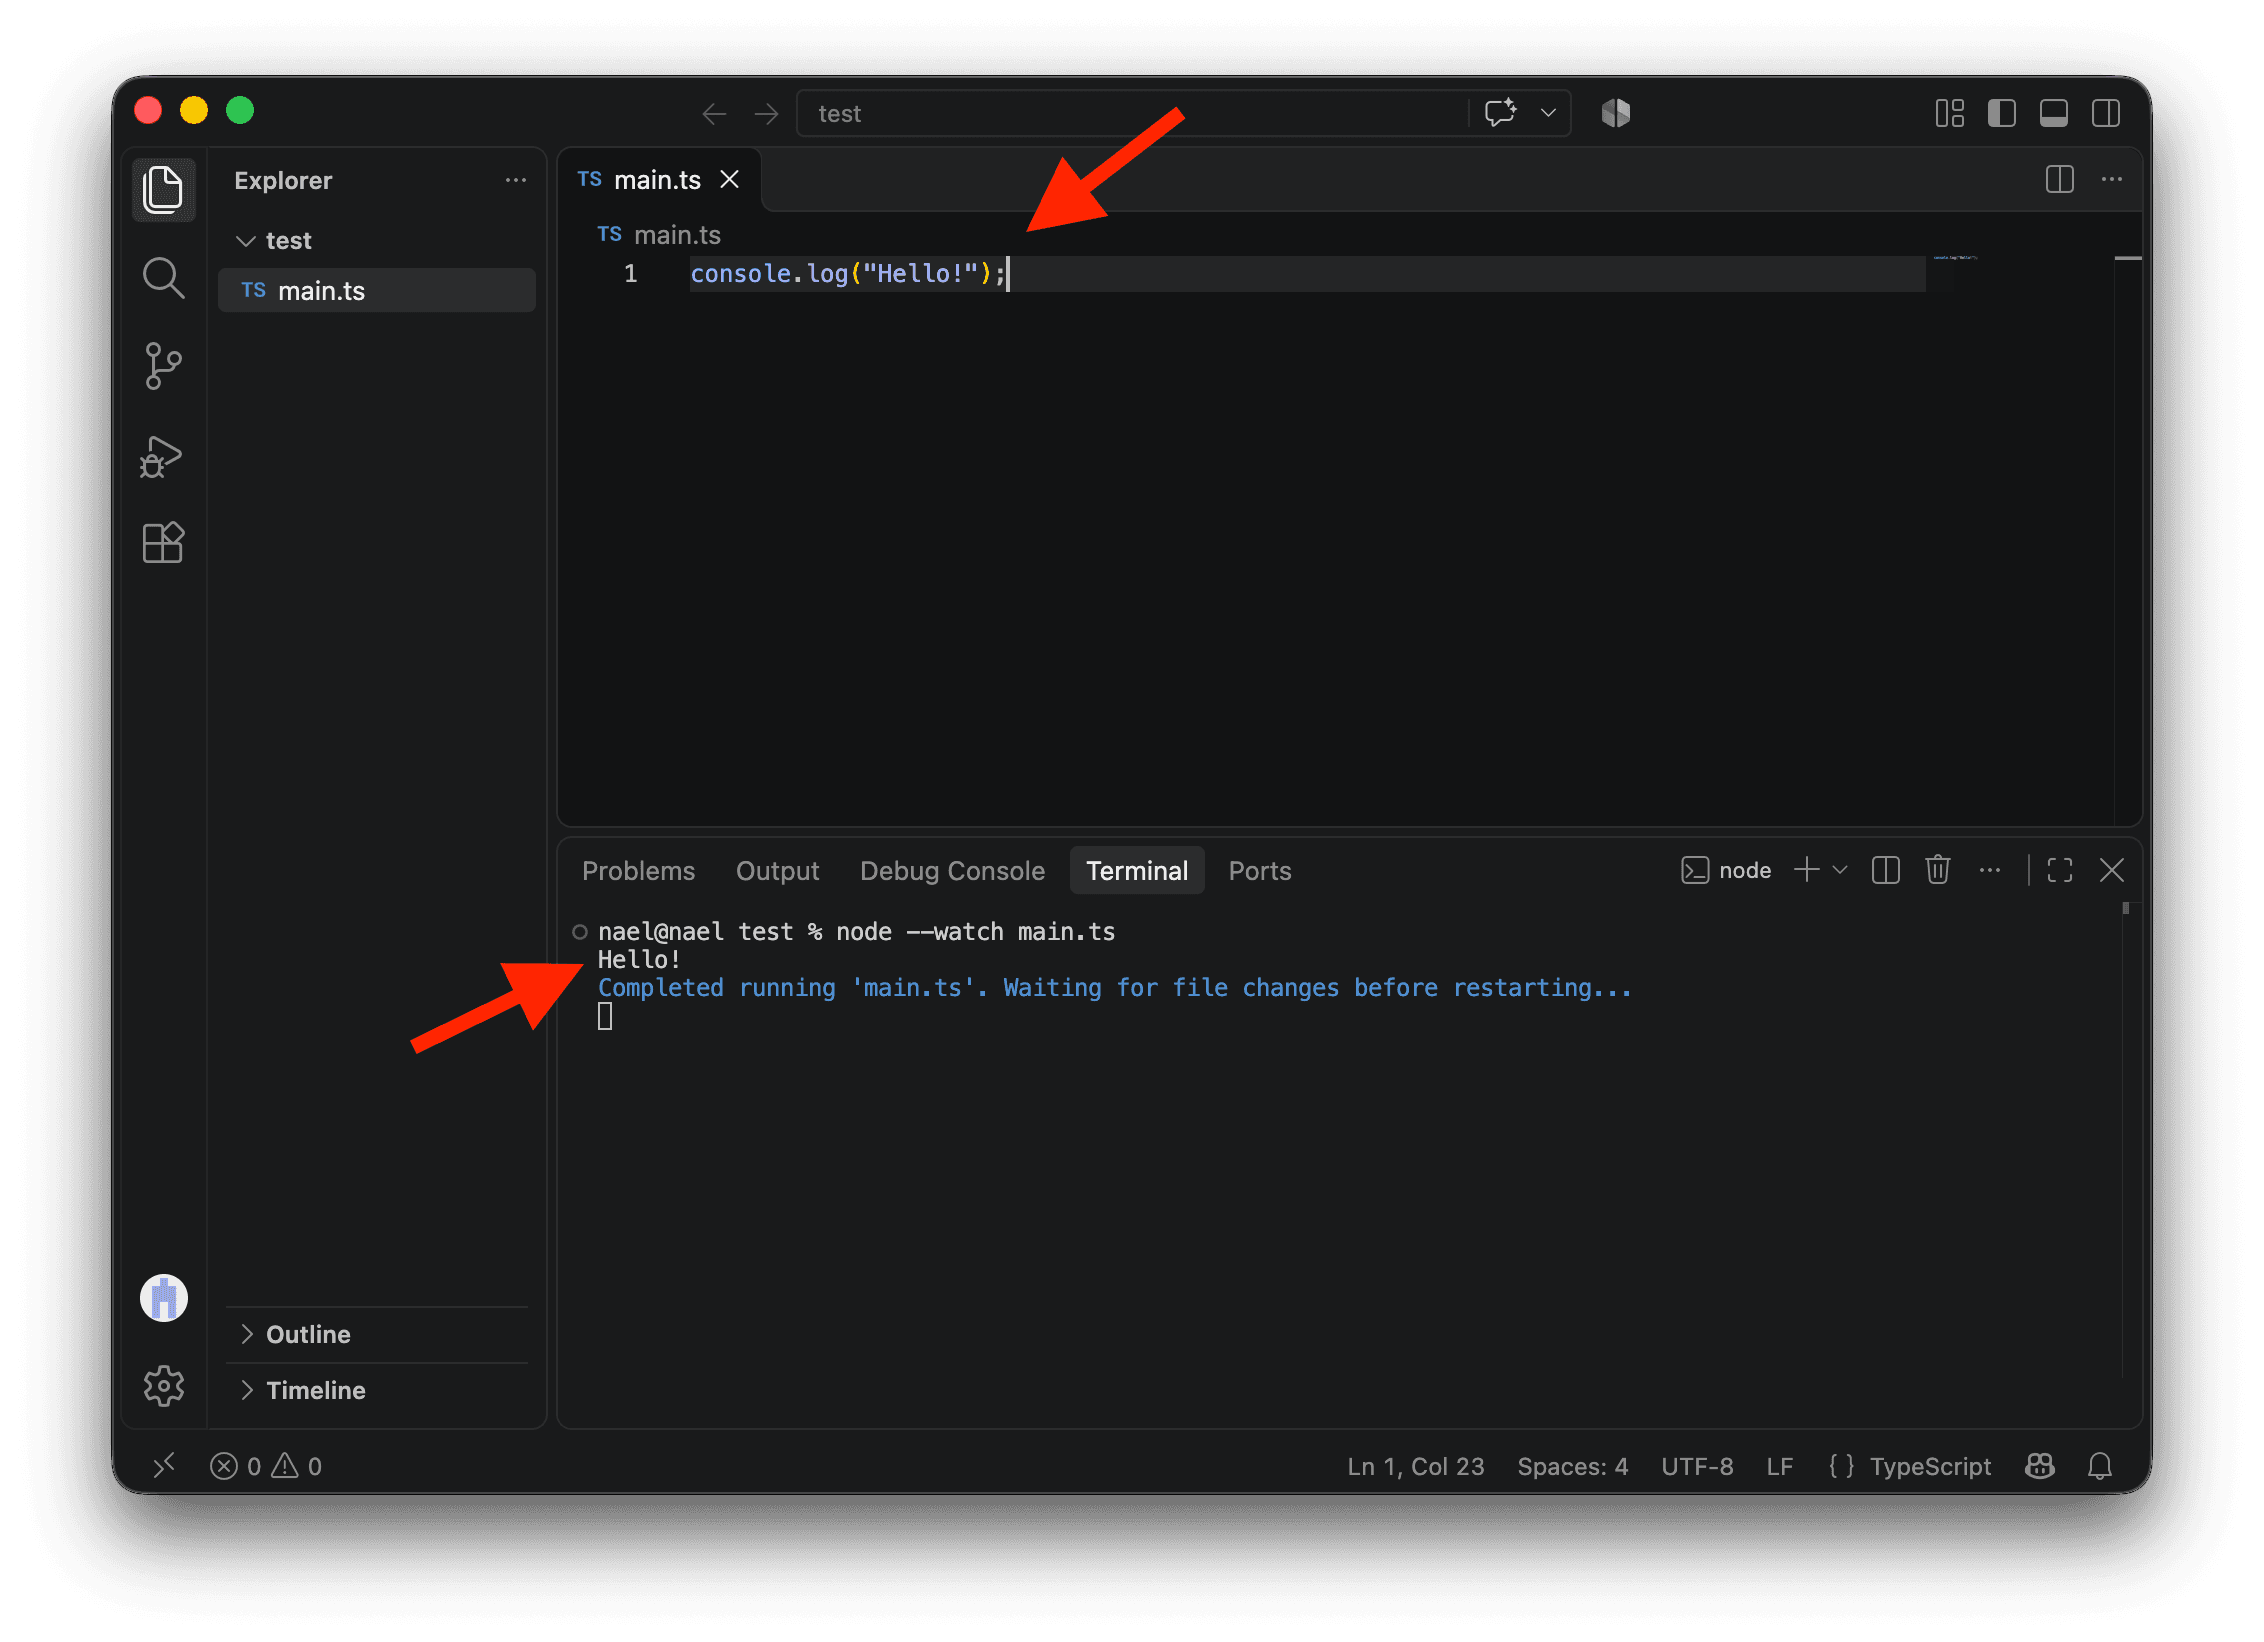
You may have noticed that your code is written with multiple colors. This is called code highlighting. In code, each word has a different role and is assigned a color. For example, here console is an object, and log is one of its methods. Also, while typing, you may see auto-complete suggestions and pop-ups. This is called IntelliSense. It’s your editor trying to guess what you might want to write and providing documentation for you. For now, you can ignore this, but we will make great use of it later.
Variables with const
Now, let’s add variables to our code.
Variables are like containers. You can put stuff in them, and when you reference them, Node.js will look at what’s inside and use it. This is very convenient because you can reuse the same variable throughout your code.
Let’s replace our greeting with a calculation. We’ll put 2 in the variable a and 4 in b, then store their sum in the variable c. Update main.ts with the code below.
We create these variables using the const keyword, which means we’re creating constant variables. We’ll see another type of variable later in this lesson.
const a = 2;
const b = 4;
const c = a + b;
console.log(c);Have you noticed all the semicolons? They mark the end of an instruction you give your computer. Your code will often still run without them because Node.js can infer where they should be, but we’ll include them in our code examples as a good coding habit.
Your computer will run this code from top to bottom. Line 1 will execute, then line 2, and so on.
If you save, you’ll see 6 in the terminal. You just performed a calculation using variables!
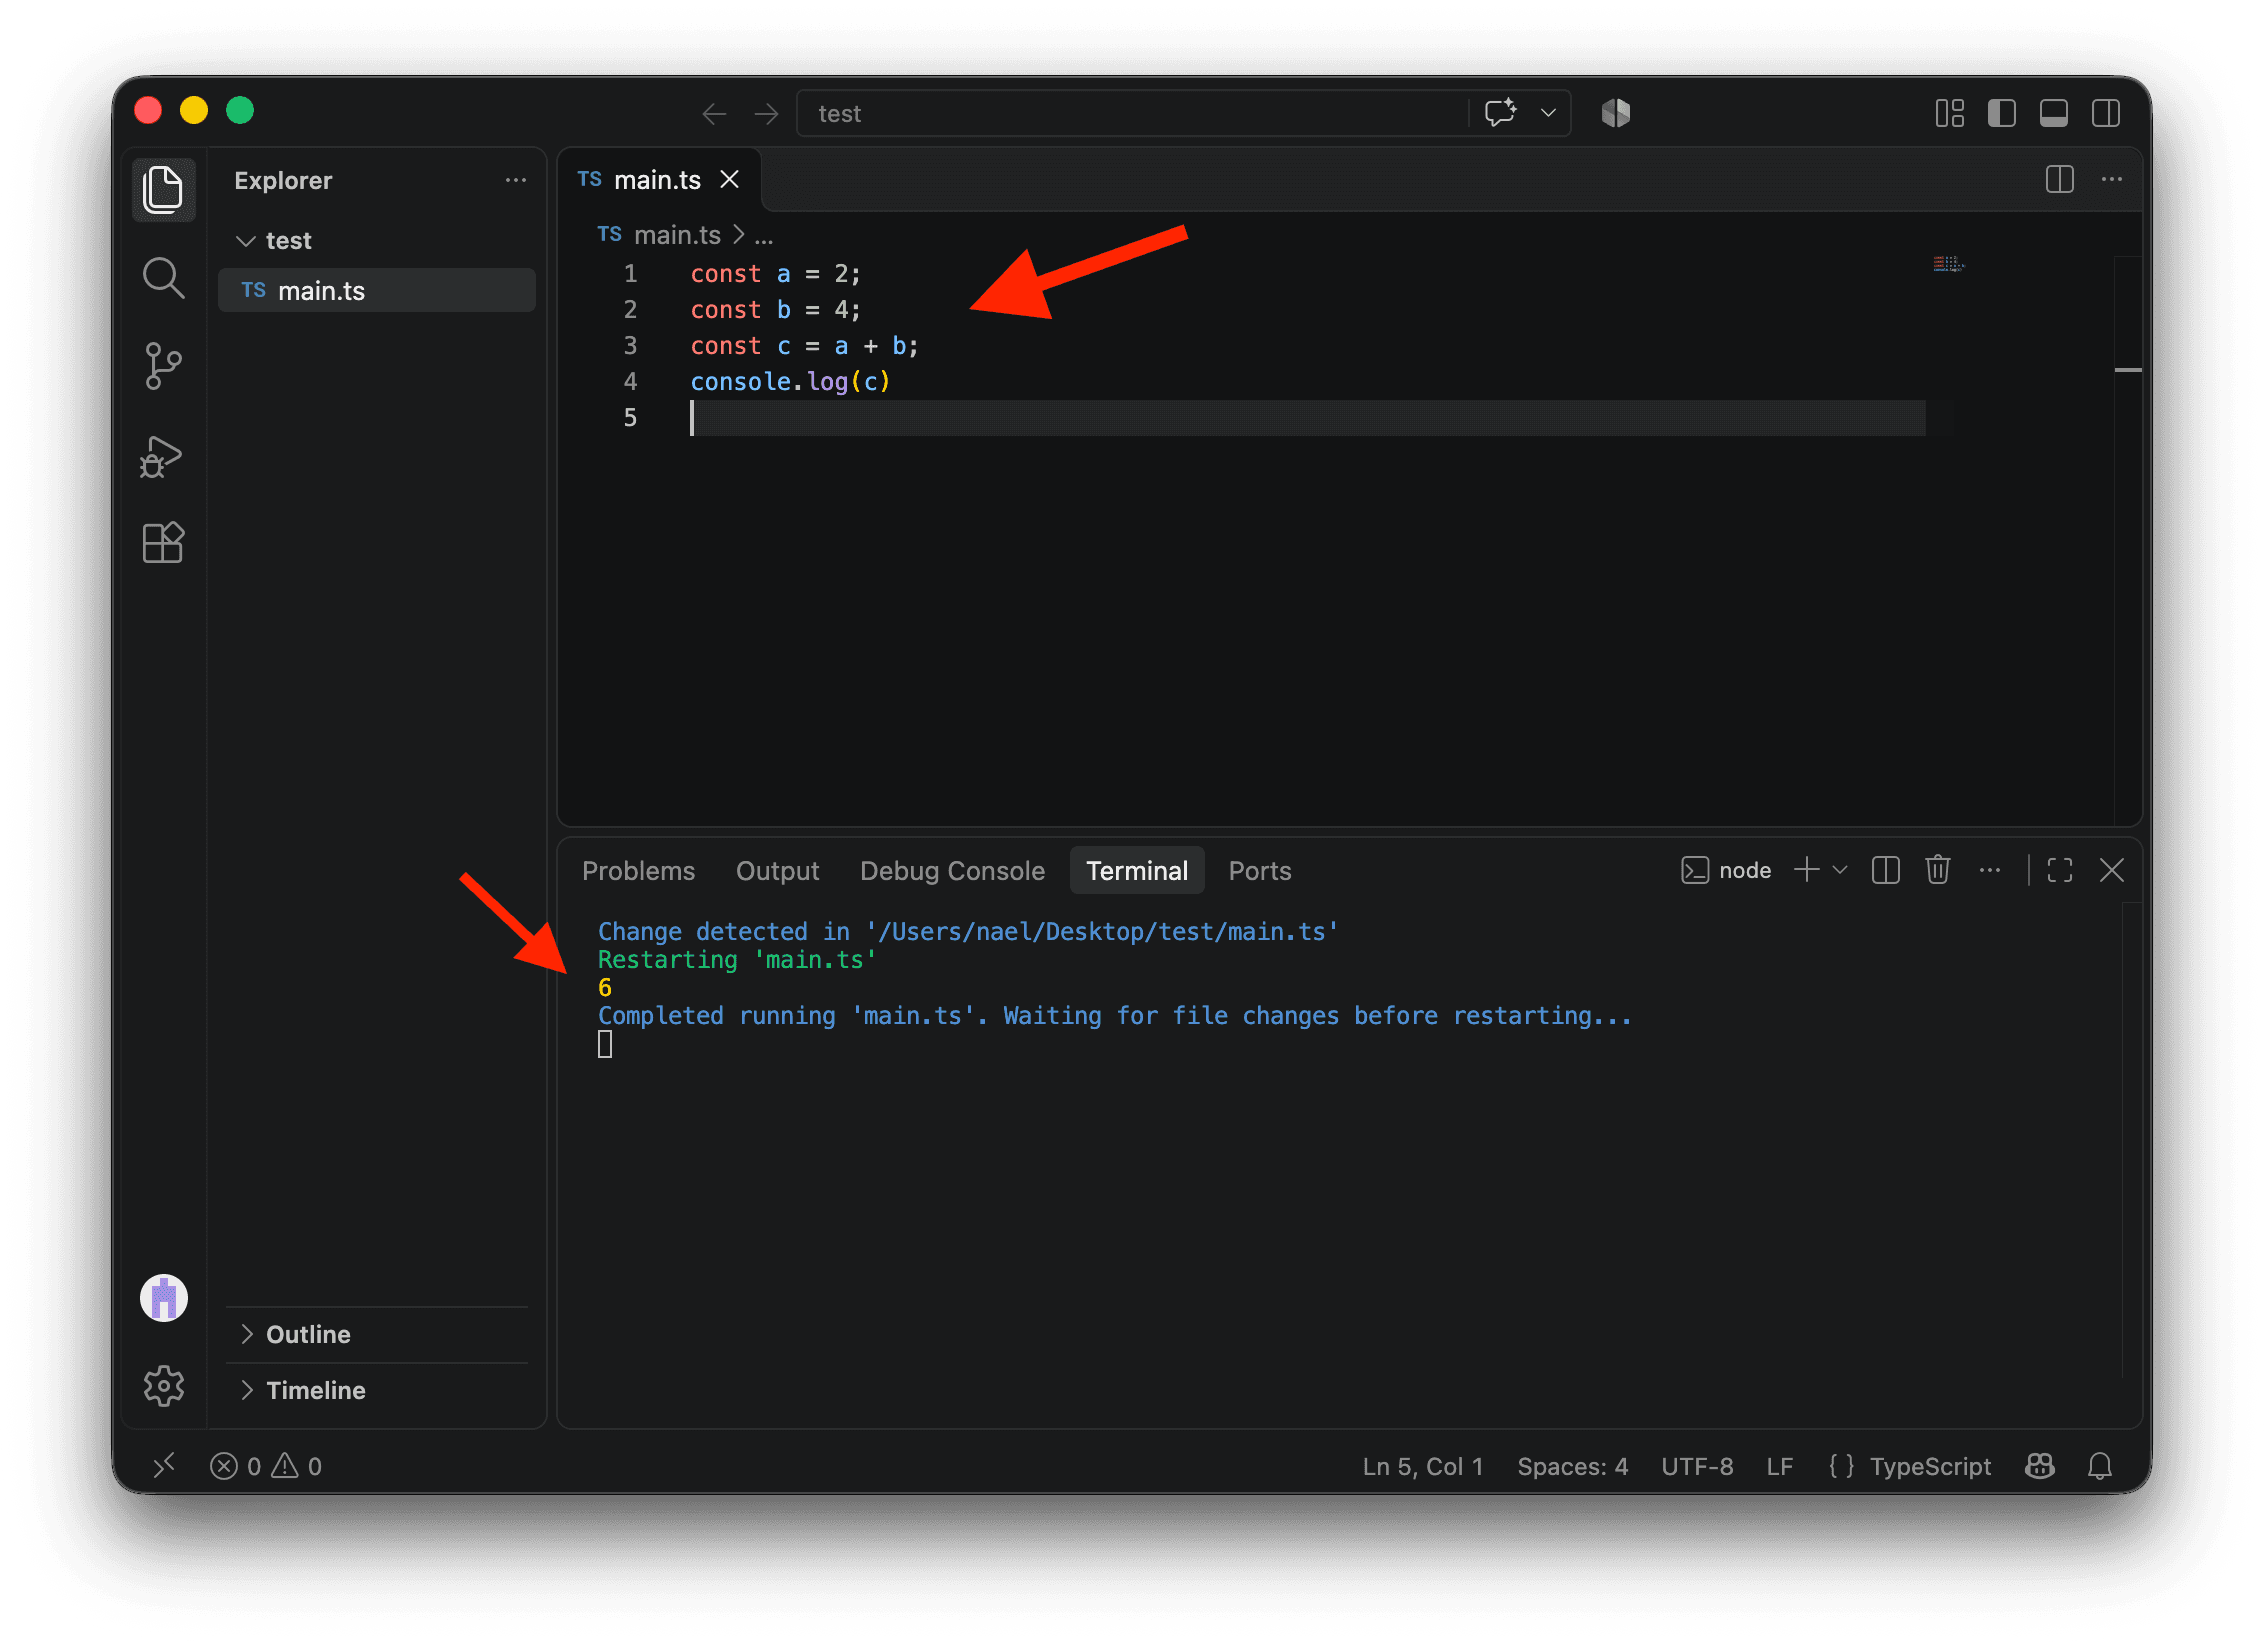
c is the result of the sum of a and b, so if you change a to 3, it will change the value in c. Instead of 6, your computer will log 7. Try it!
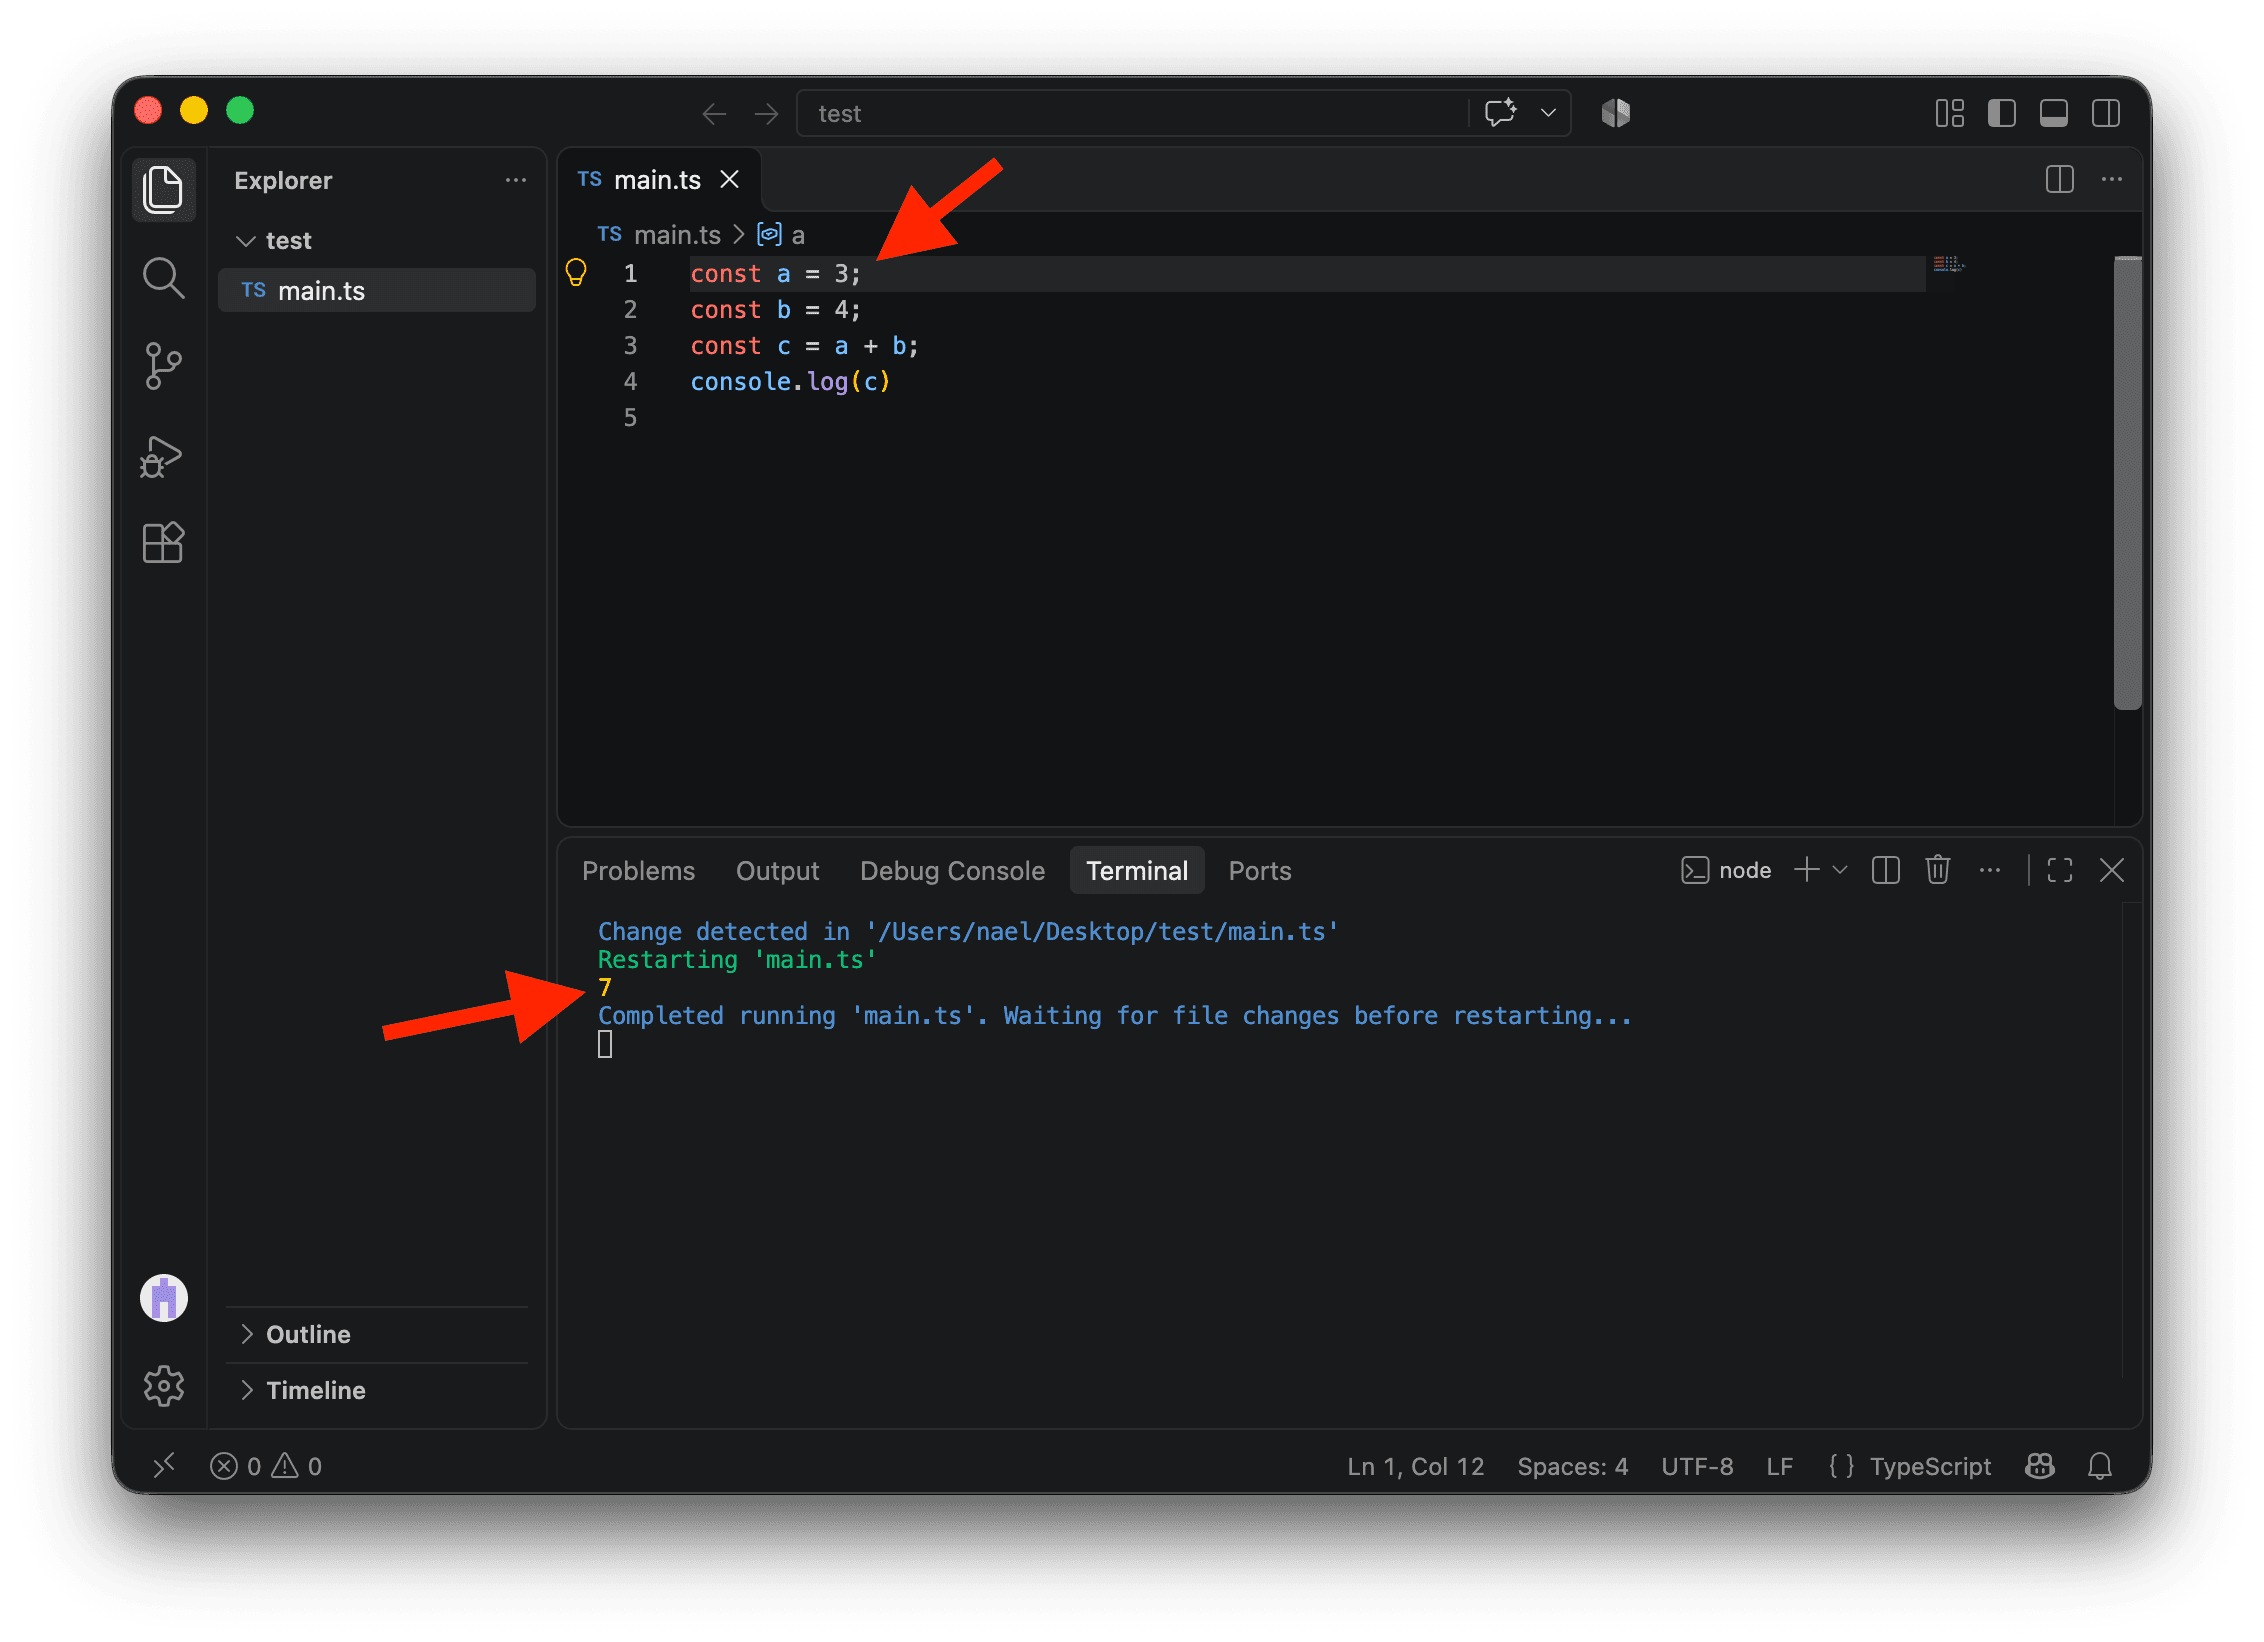
Variables are everywhere in code because they let you abstract and reuse your logic.
We used a, b, and c for the variable names, but you can choose other names, such as the ones below.
For example, I updated our previous code with different variable names. If you run it, the result is the same in the terminal.
const banana = 3;
const super_apple = 4;
const POTATO = banana + super_apple;
console.log(POTATO);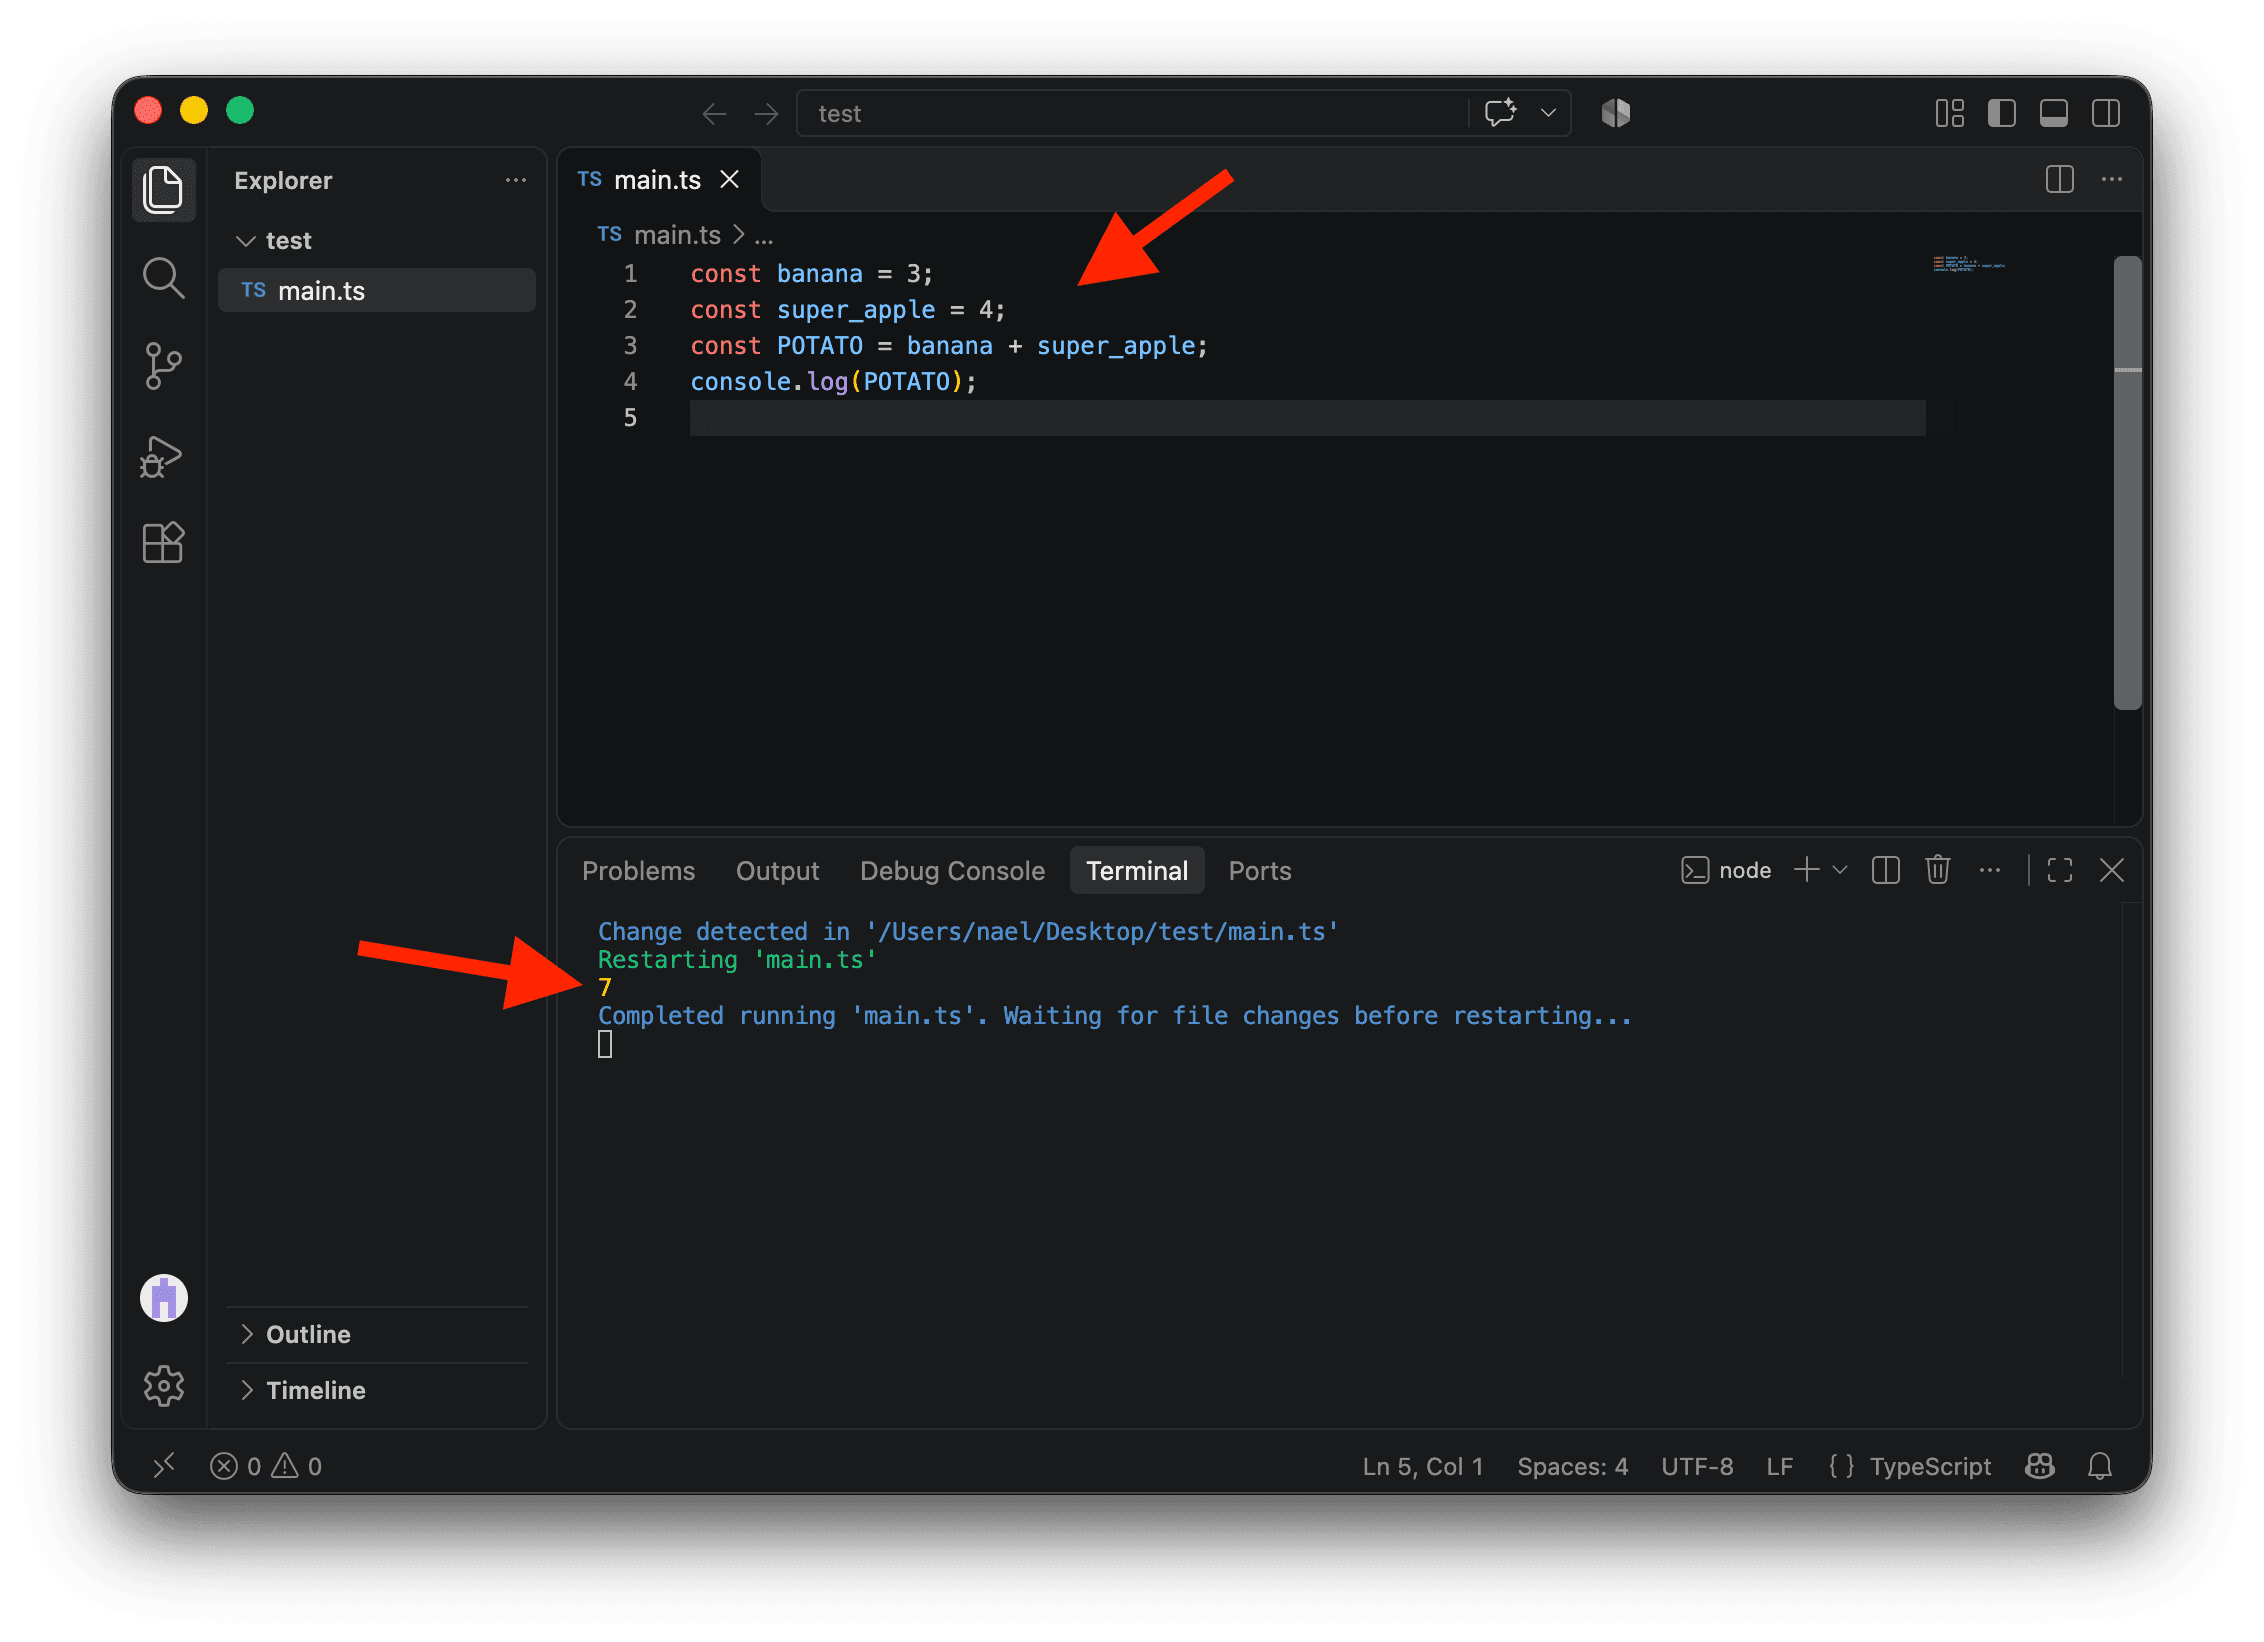
To avoid confusion in the code, it’s important to thoughtfully name variables. When a variable name is composed of multiple words, we use camel case by convention. This means that the first word is lowercase, followed by the next words capitalized. For example, first name would be firstName. Different languages and contexts use different casing styles, such as snake case in Python (first_name) or the delicious kebab case for web development (first-name).
Variables with let
There are two main ways to create variables:
- With
const, if you intend to keep the content constant, as we’ve done above. This should be your go-to. - With
let, if you need to overwrite the content.
Let’s see what happens when we try to overwrite a variable created with const. On line 6, we try to overwrite the value of c with 10. On line 7, we try to log its new value.
const a = 3;
const b = 4;
const c = a + b;
console.log(c);

c = 10;
console.log(c);
Update main.ts with this code and save the file. This is what you should see:
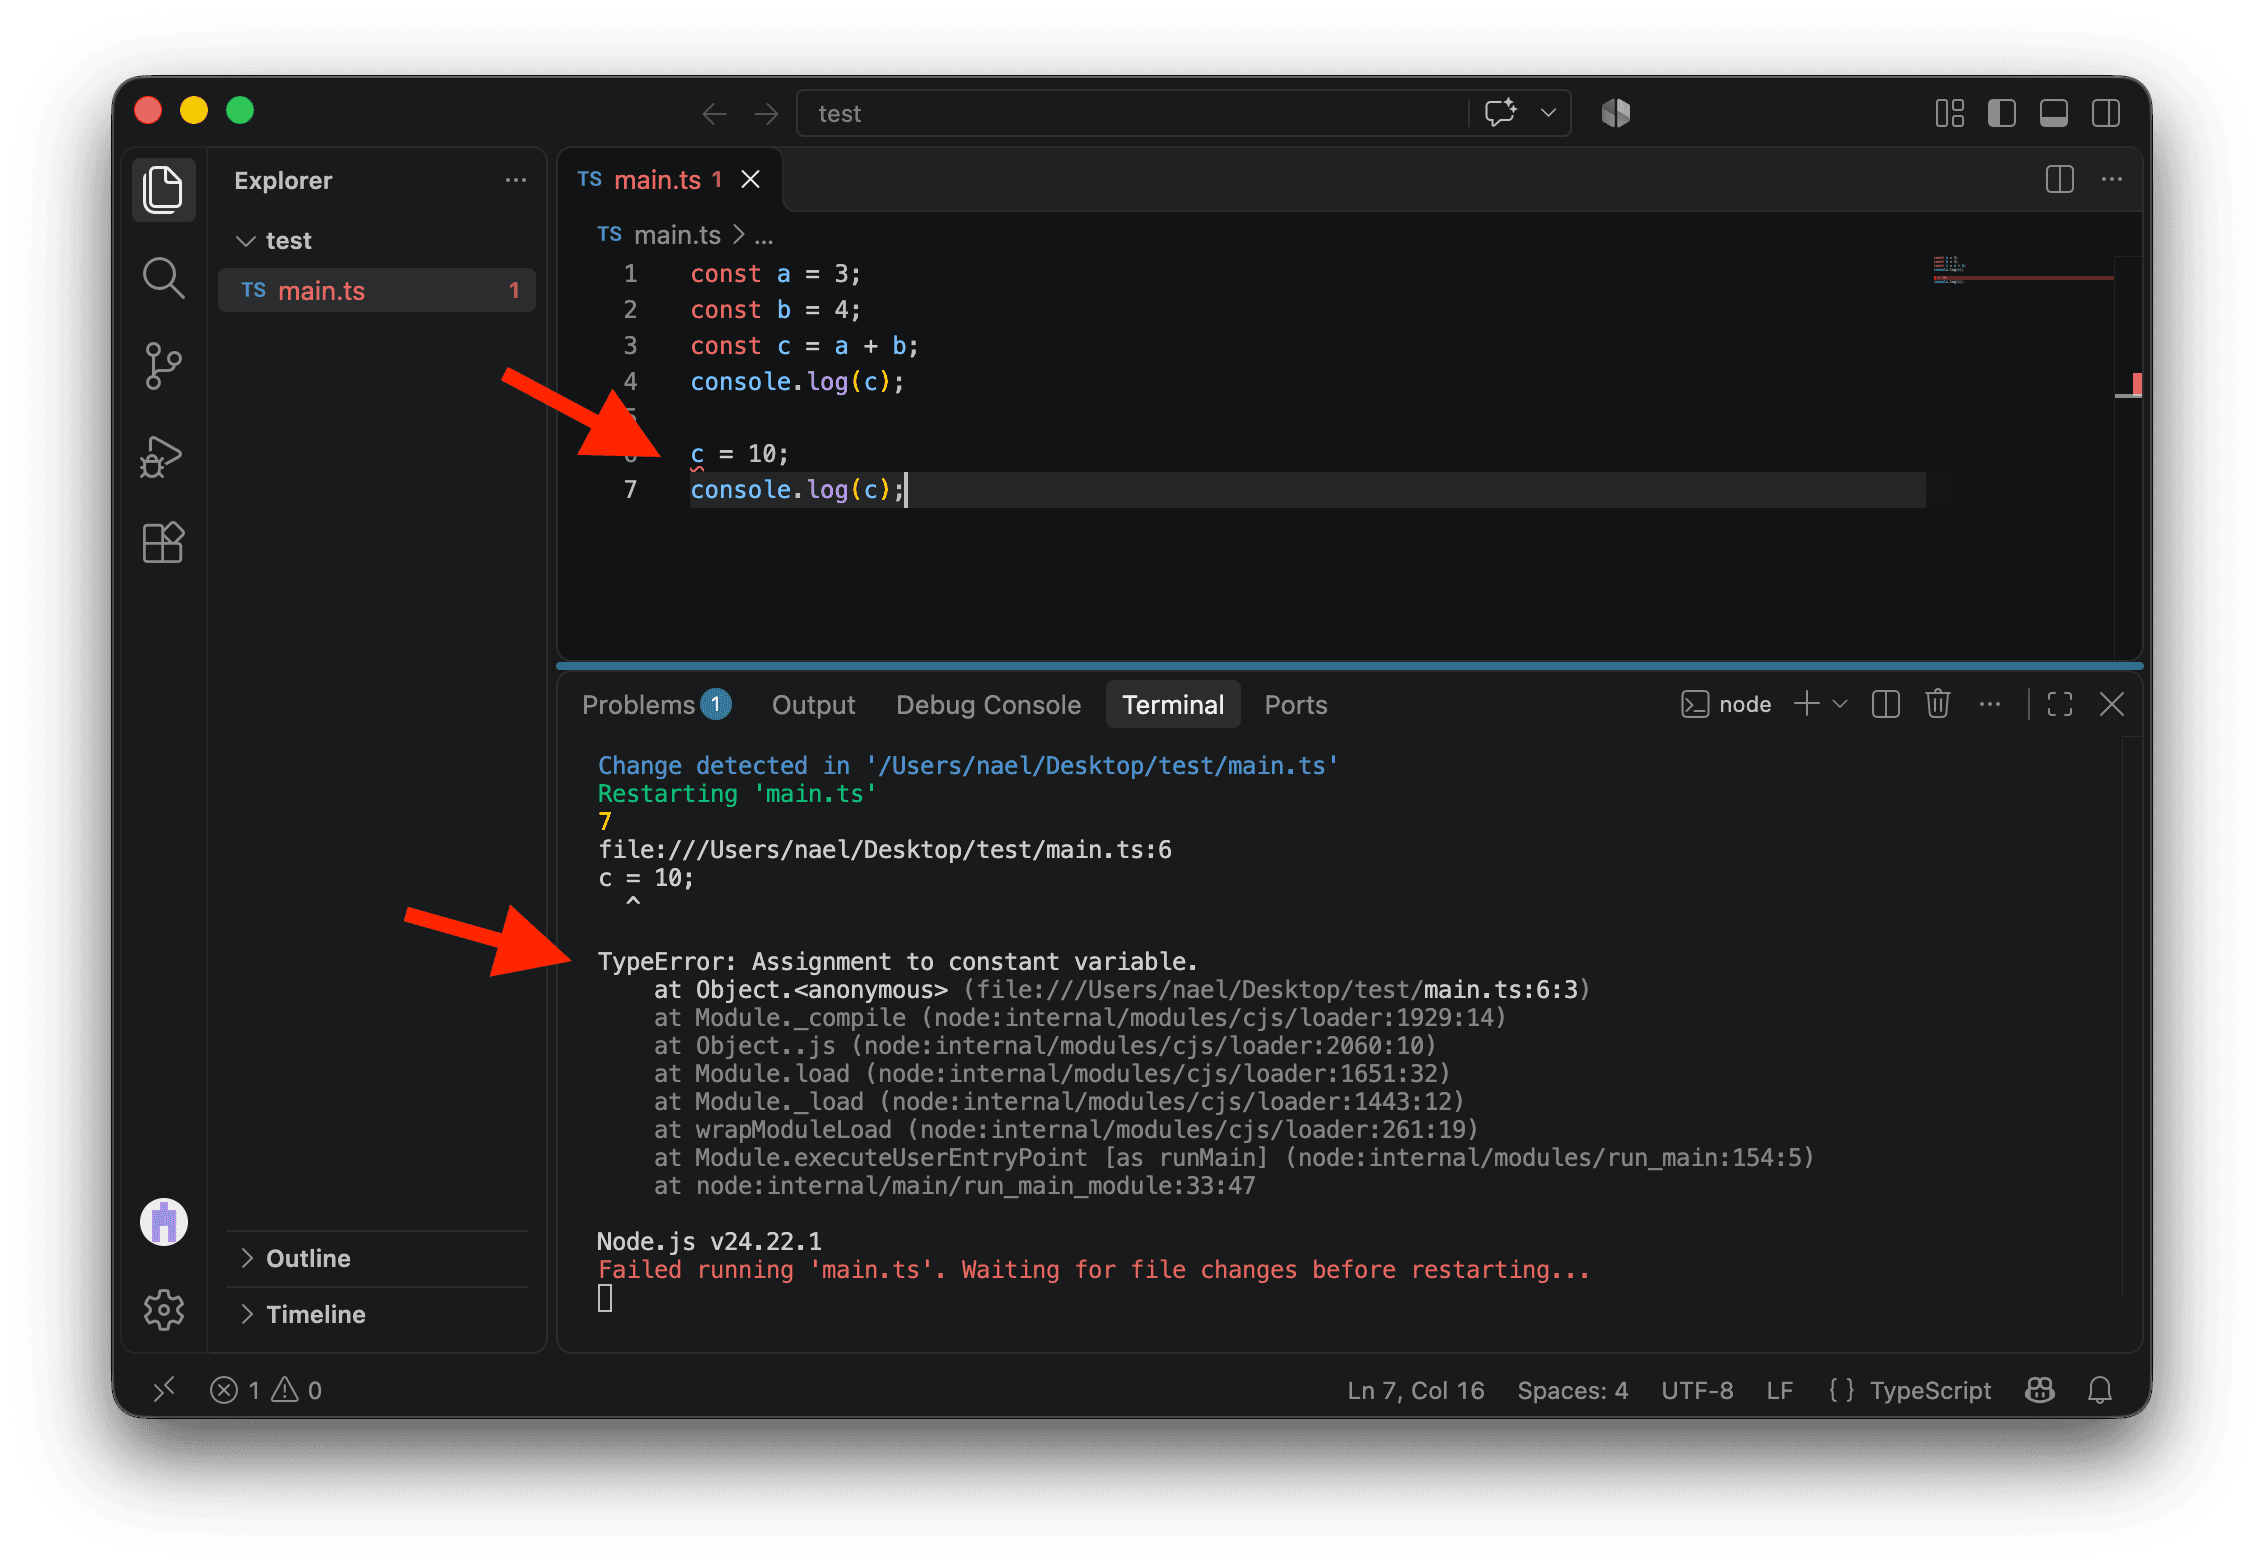
Let’s start with the terminal. First, it logs 7 from console.log(c) on line 4. Everything is working so far.
On line 6, c = 10 causes TypeError: Assignment to constant variable, and Node.js stops running the code. Overwriting a variable created with const is forbidden. This helps prevent accidental changes to values, which is useful when analyzing data.
When throwing an error, Node.js will tell you where the problematic code is. For example, .../main.ts:6:3 means the main.ts file, at the sixth line and third character. If you press CMD on Mac or CTRL on PC and click on this file path, it will take you directly to it. This is very convenient when you start working with a lot of files.
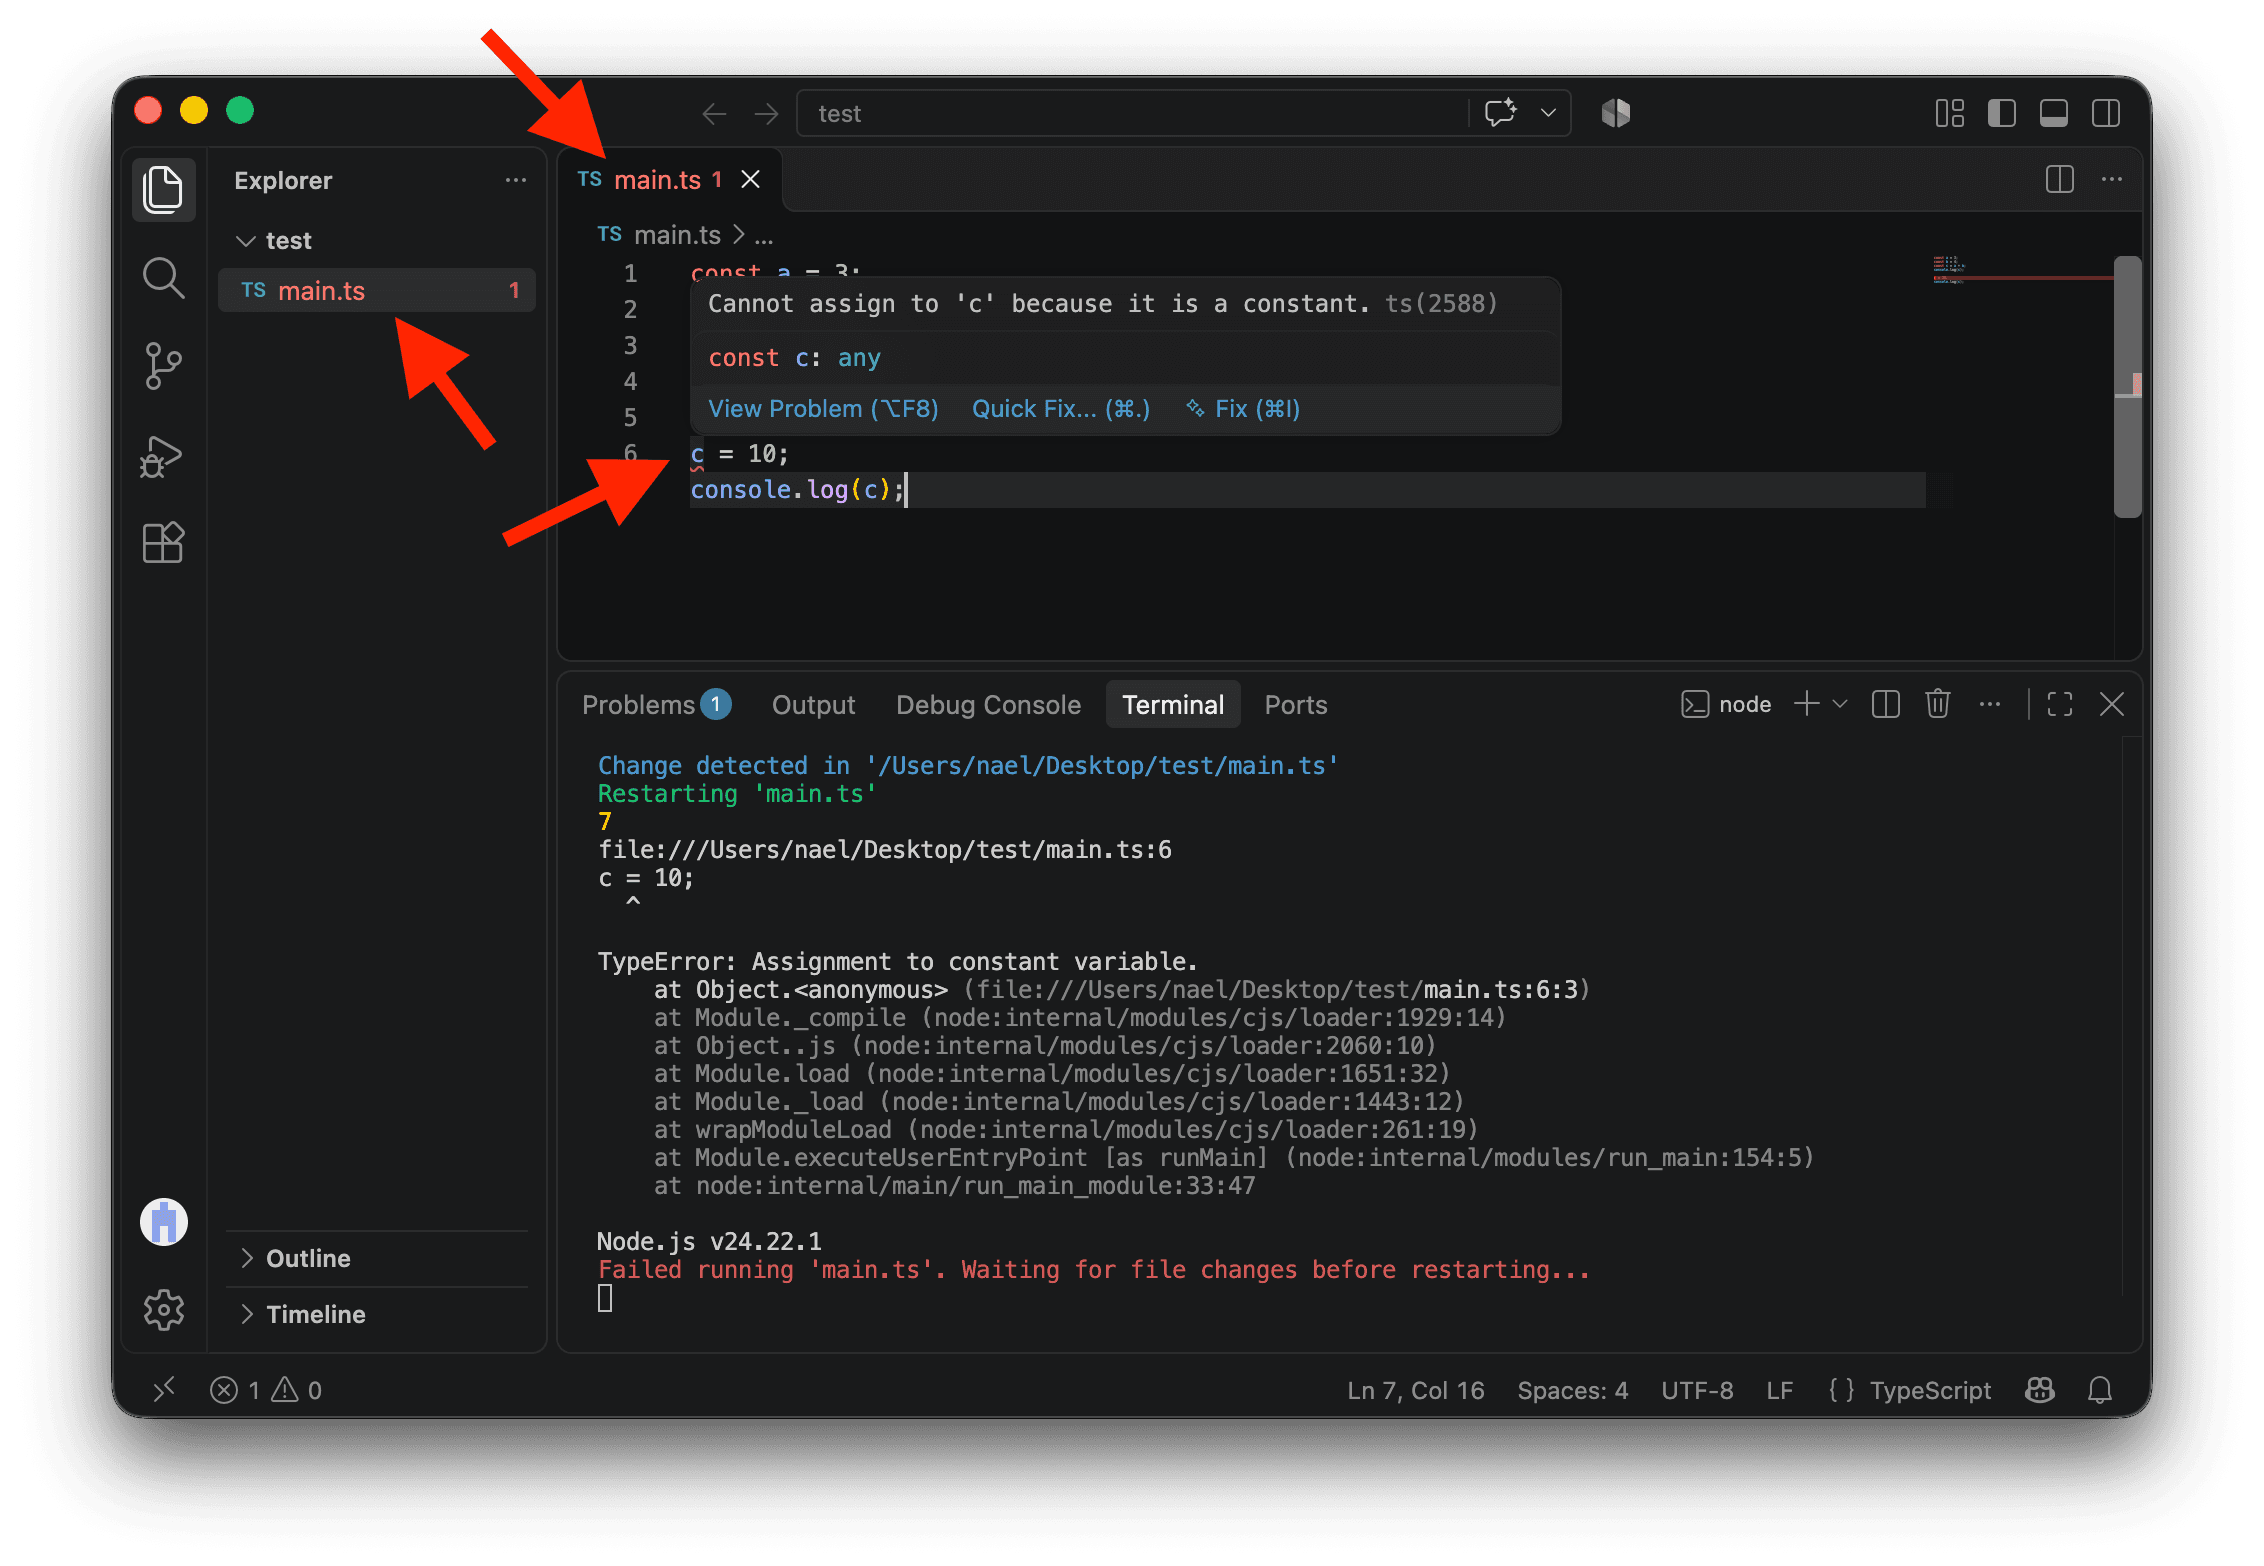
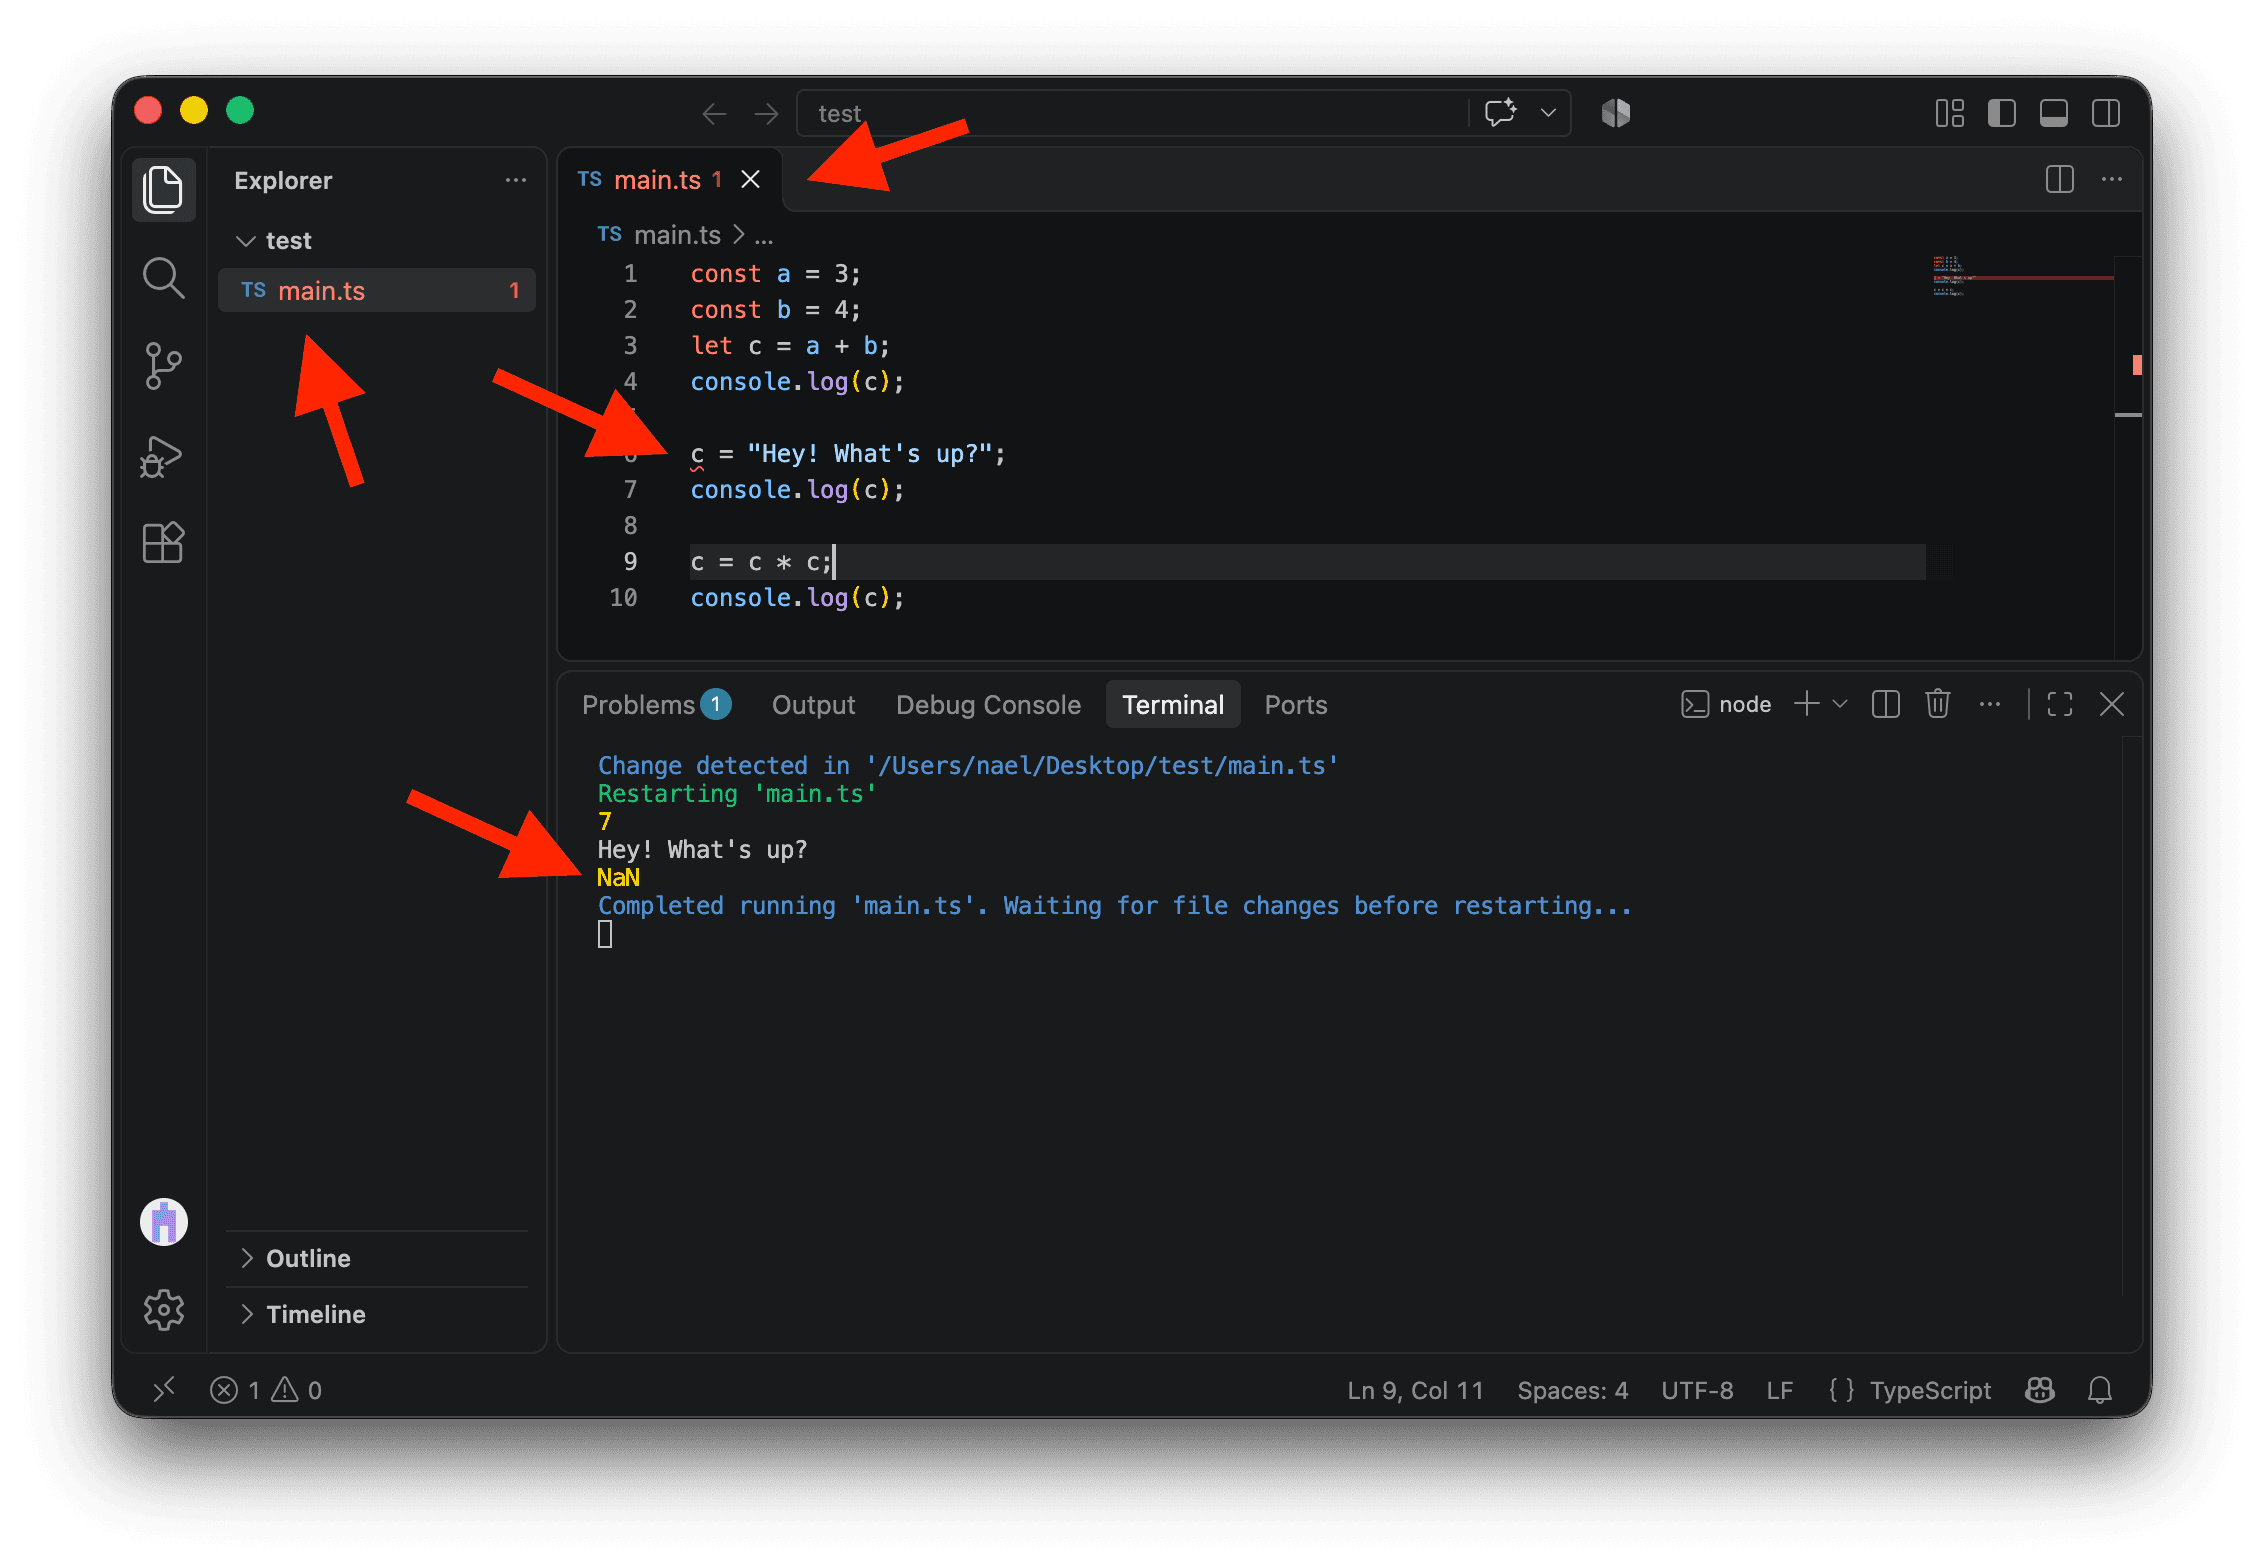
By the way, as you wrote this code, VS Code underlined c in red. The file name main.ts also turned red in the Explorer on the left and in the tab title at the top. The number 1 indicates that TypeScript found one error in the file, without needing to run it.
Hover over the underlined c to see the explanation: you can’t assign a new value to a constant.
This live checking helps you catch errors as you write. It can save a lot of time, especially when an analysis takes minutes or hours to run, as we’ll see in later lessons.
But how do we fix this error?
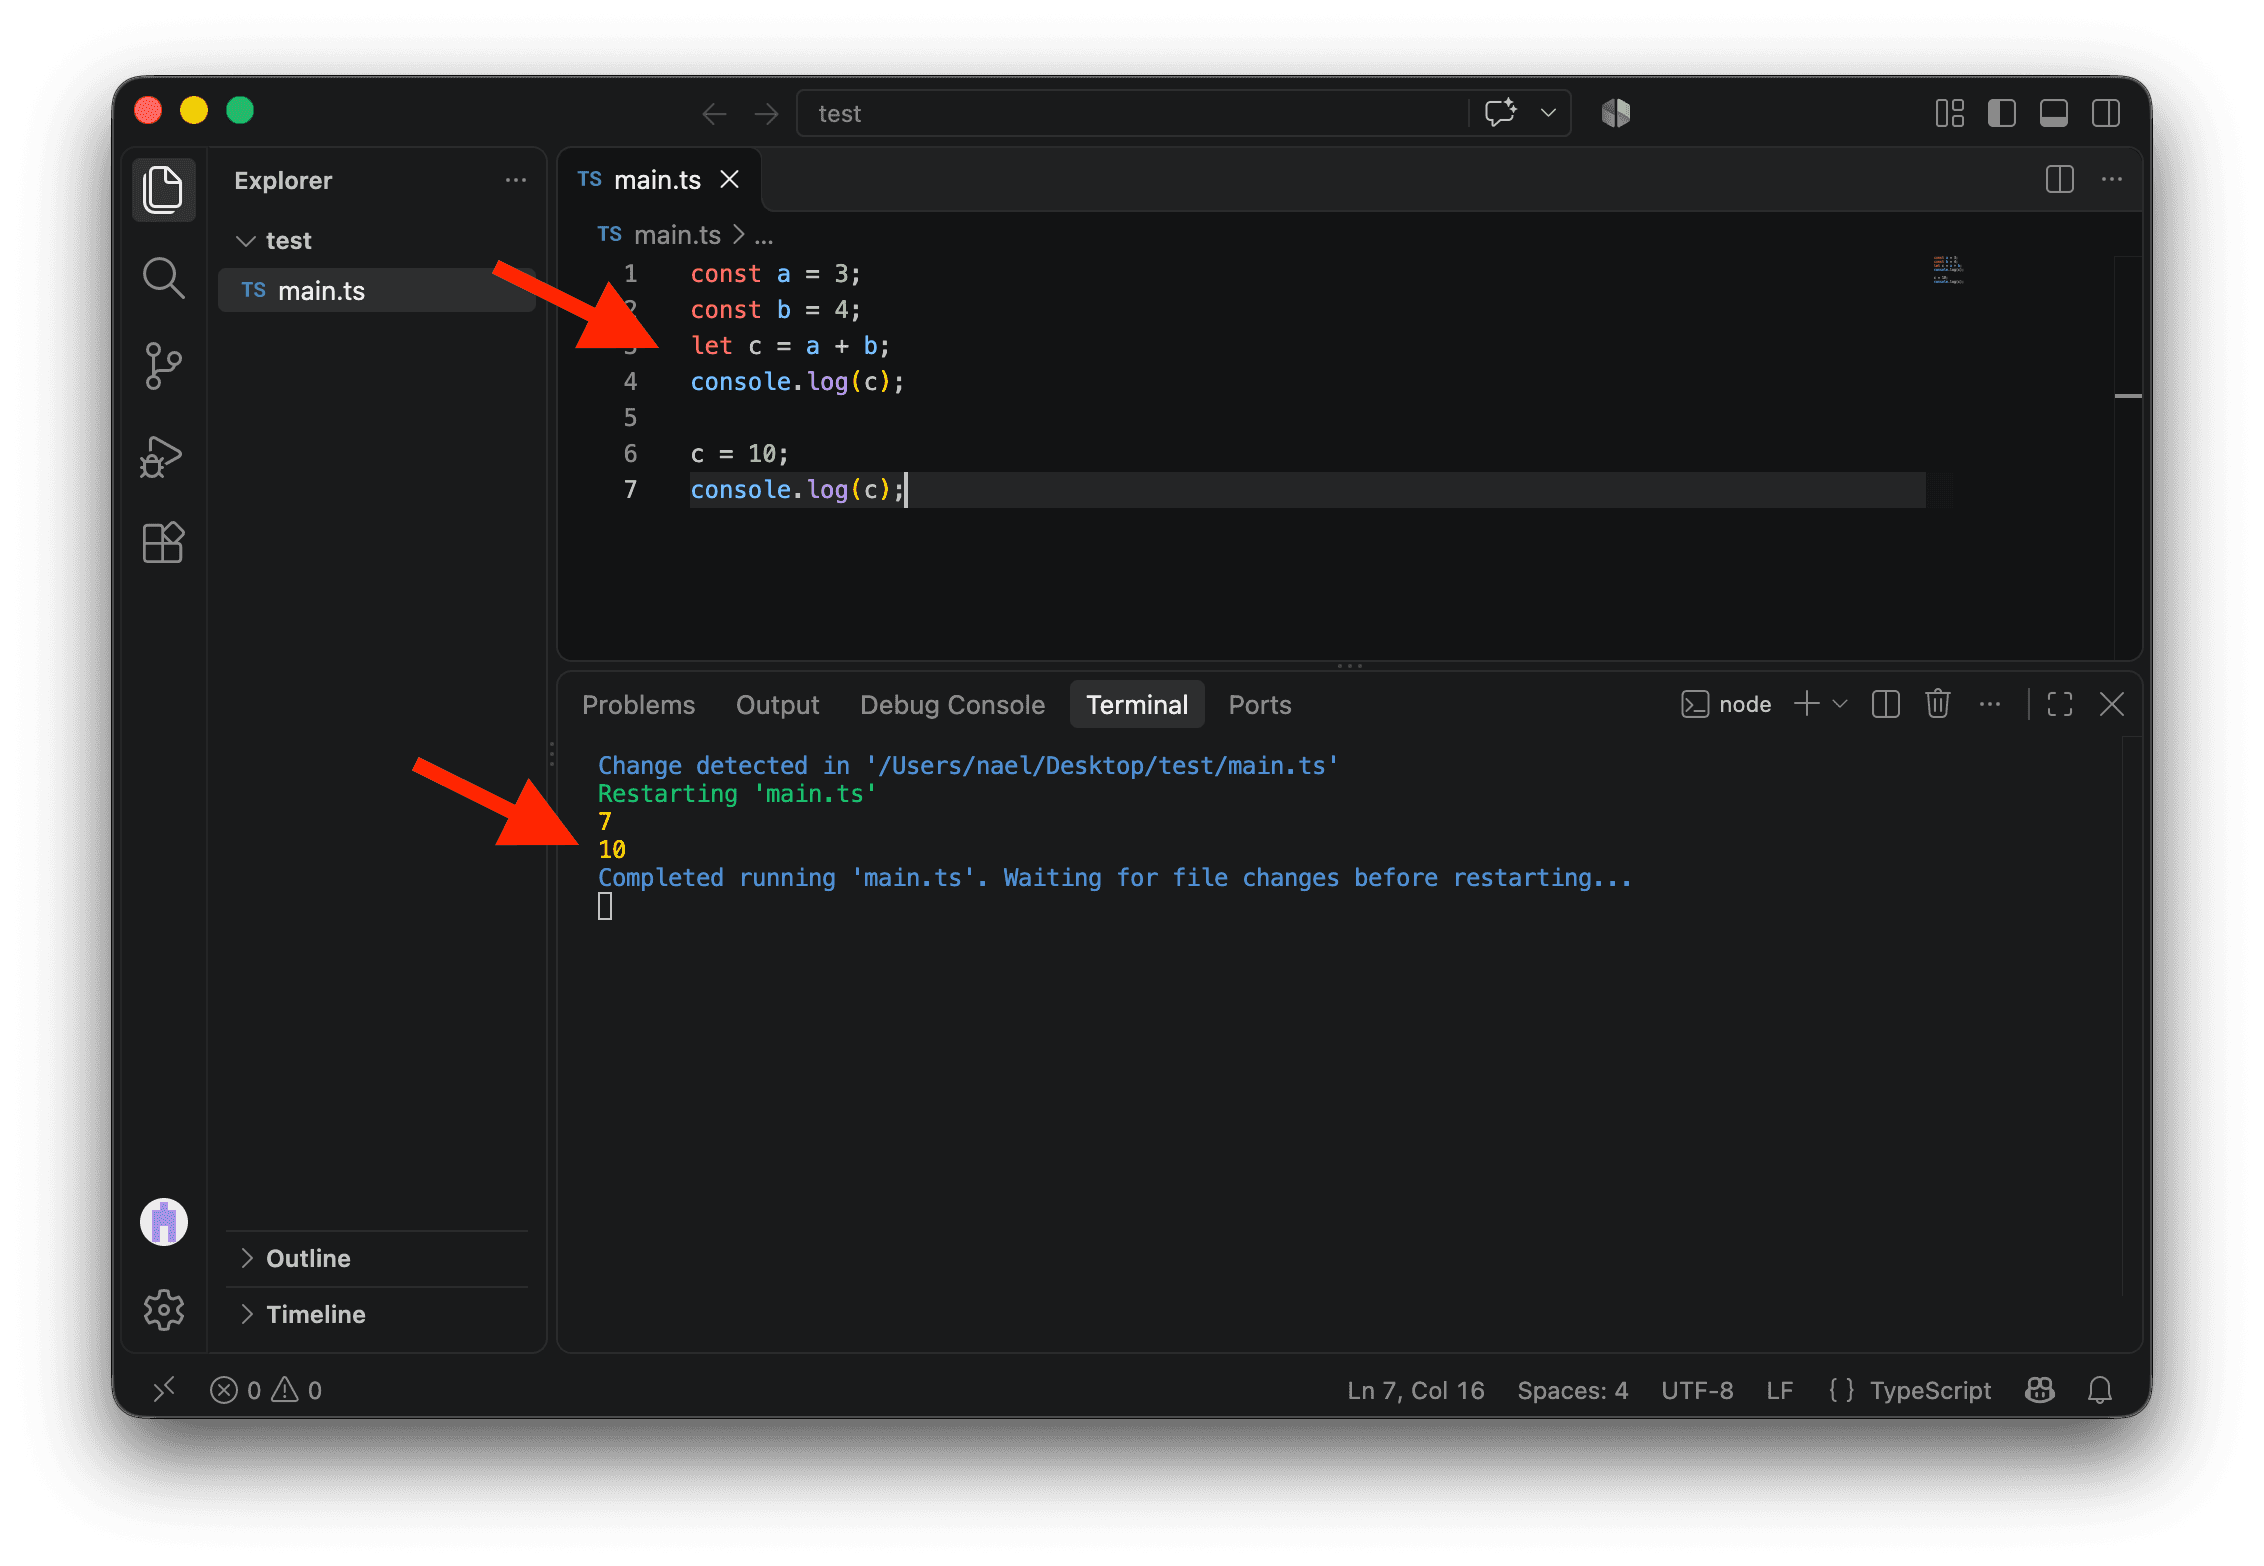
Well, if we want to overwrite the content of a variable, we need to switch const to let when creating the c variable on line 3.
const a = 3;
const b = 4;
let c = a + b;
console.log(c);

c = 10;
console.log(c);
Now it runs without any problems! If you update your code and save it, you will see the first value of c being logged in your terminal, followed by the second value.
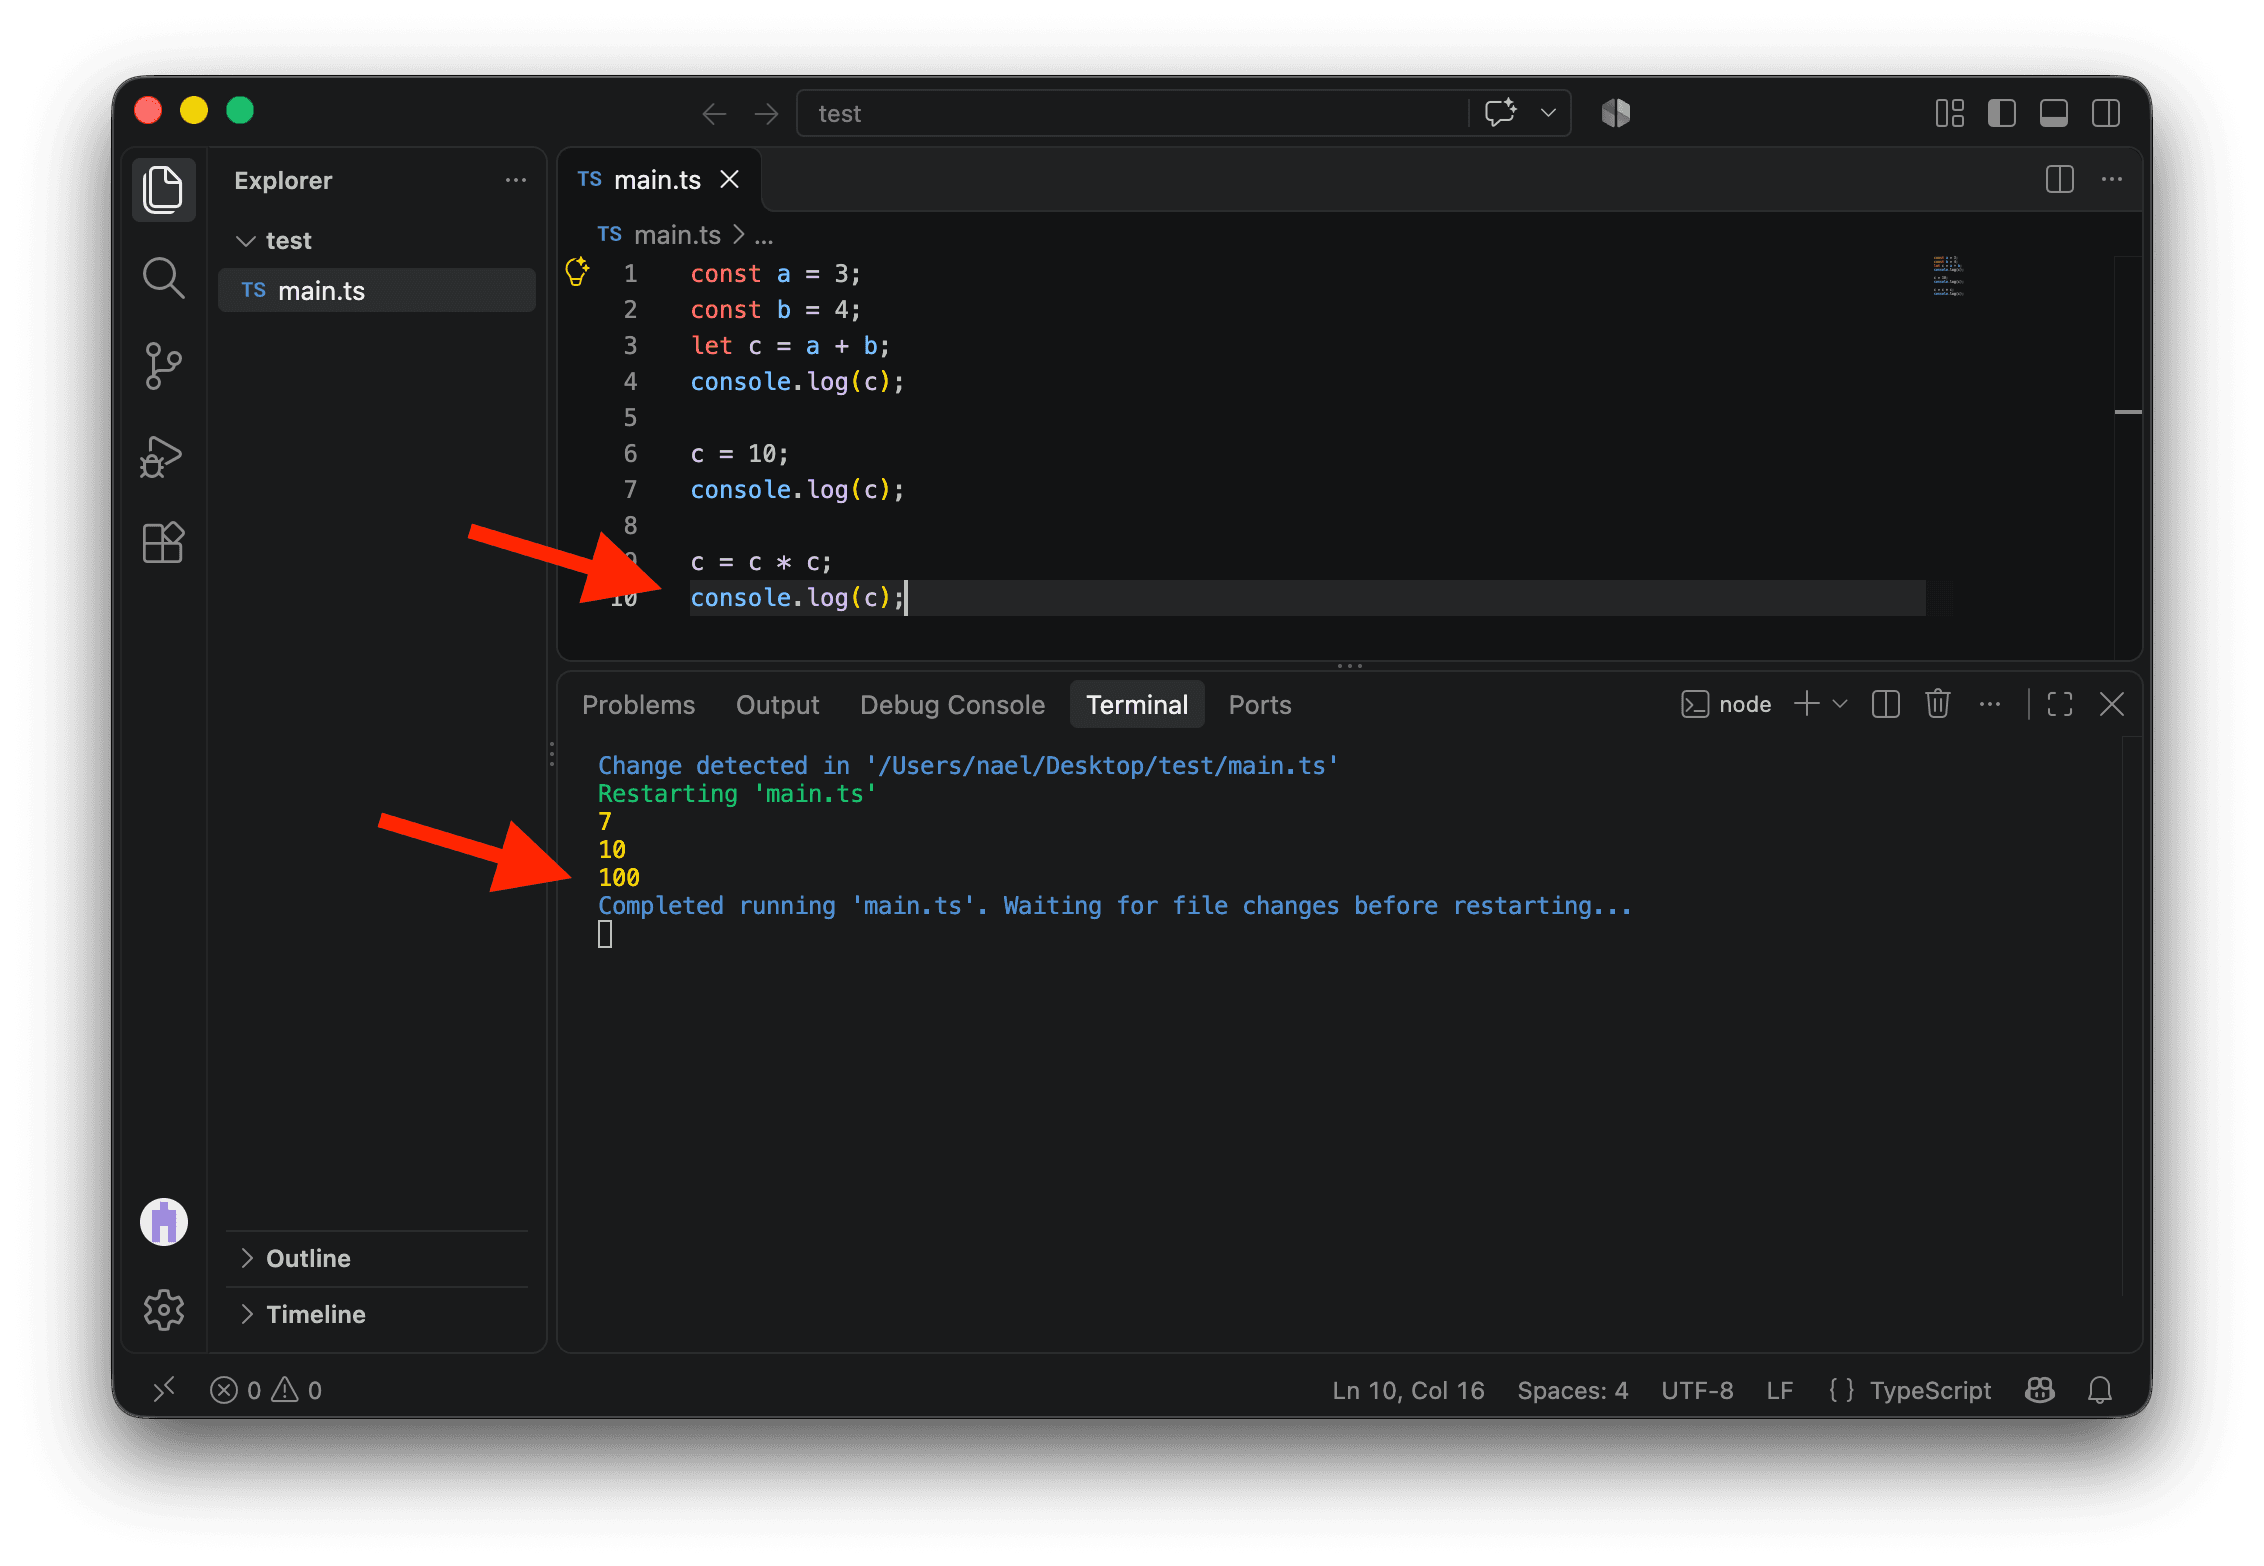
We can also reuse c to overwrite… itself! The last two lines in the code below replace c with c squared (c multiplied by itself).
const a = 3;
const b = 4;
let c = a + b;
console.log(c);

c = 10;
console.log(c);

c = c * c;
console.log(c);
The code above logs 7, then 10, then 100.
Typed variables
There is something else to know about variables: the data type matters. This is why it’s called… TypeScript!
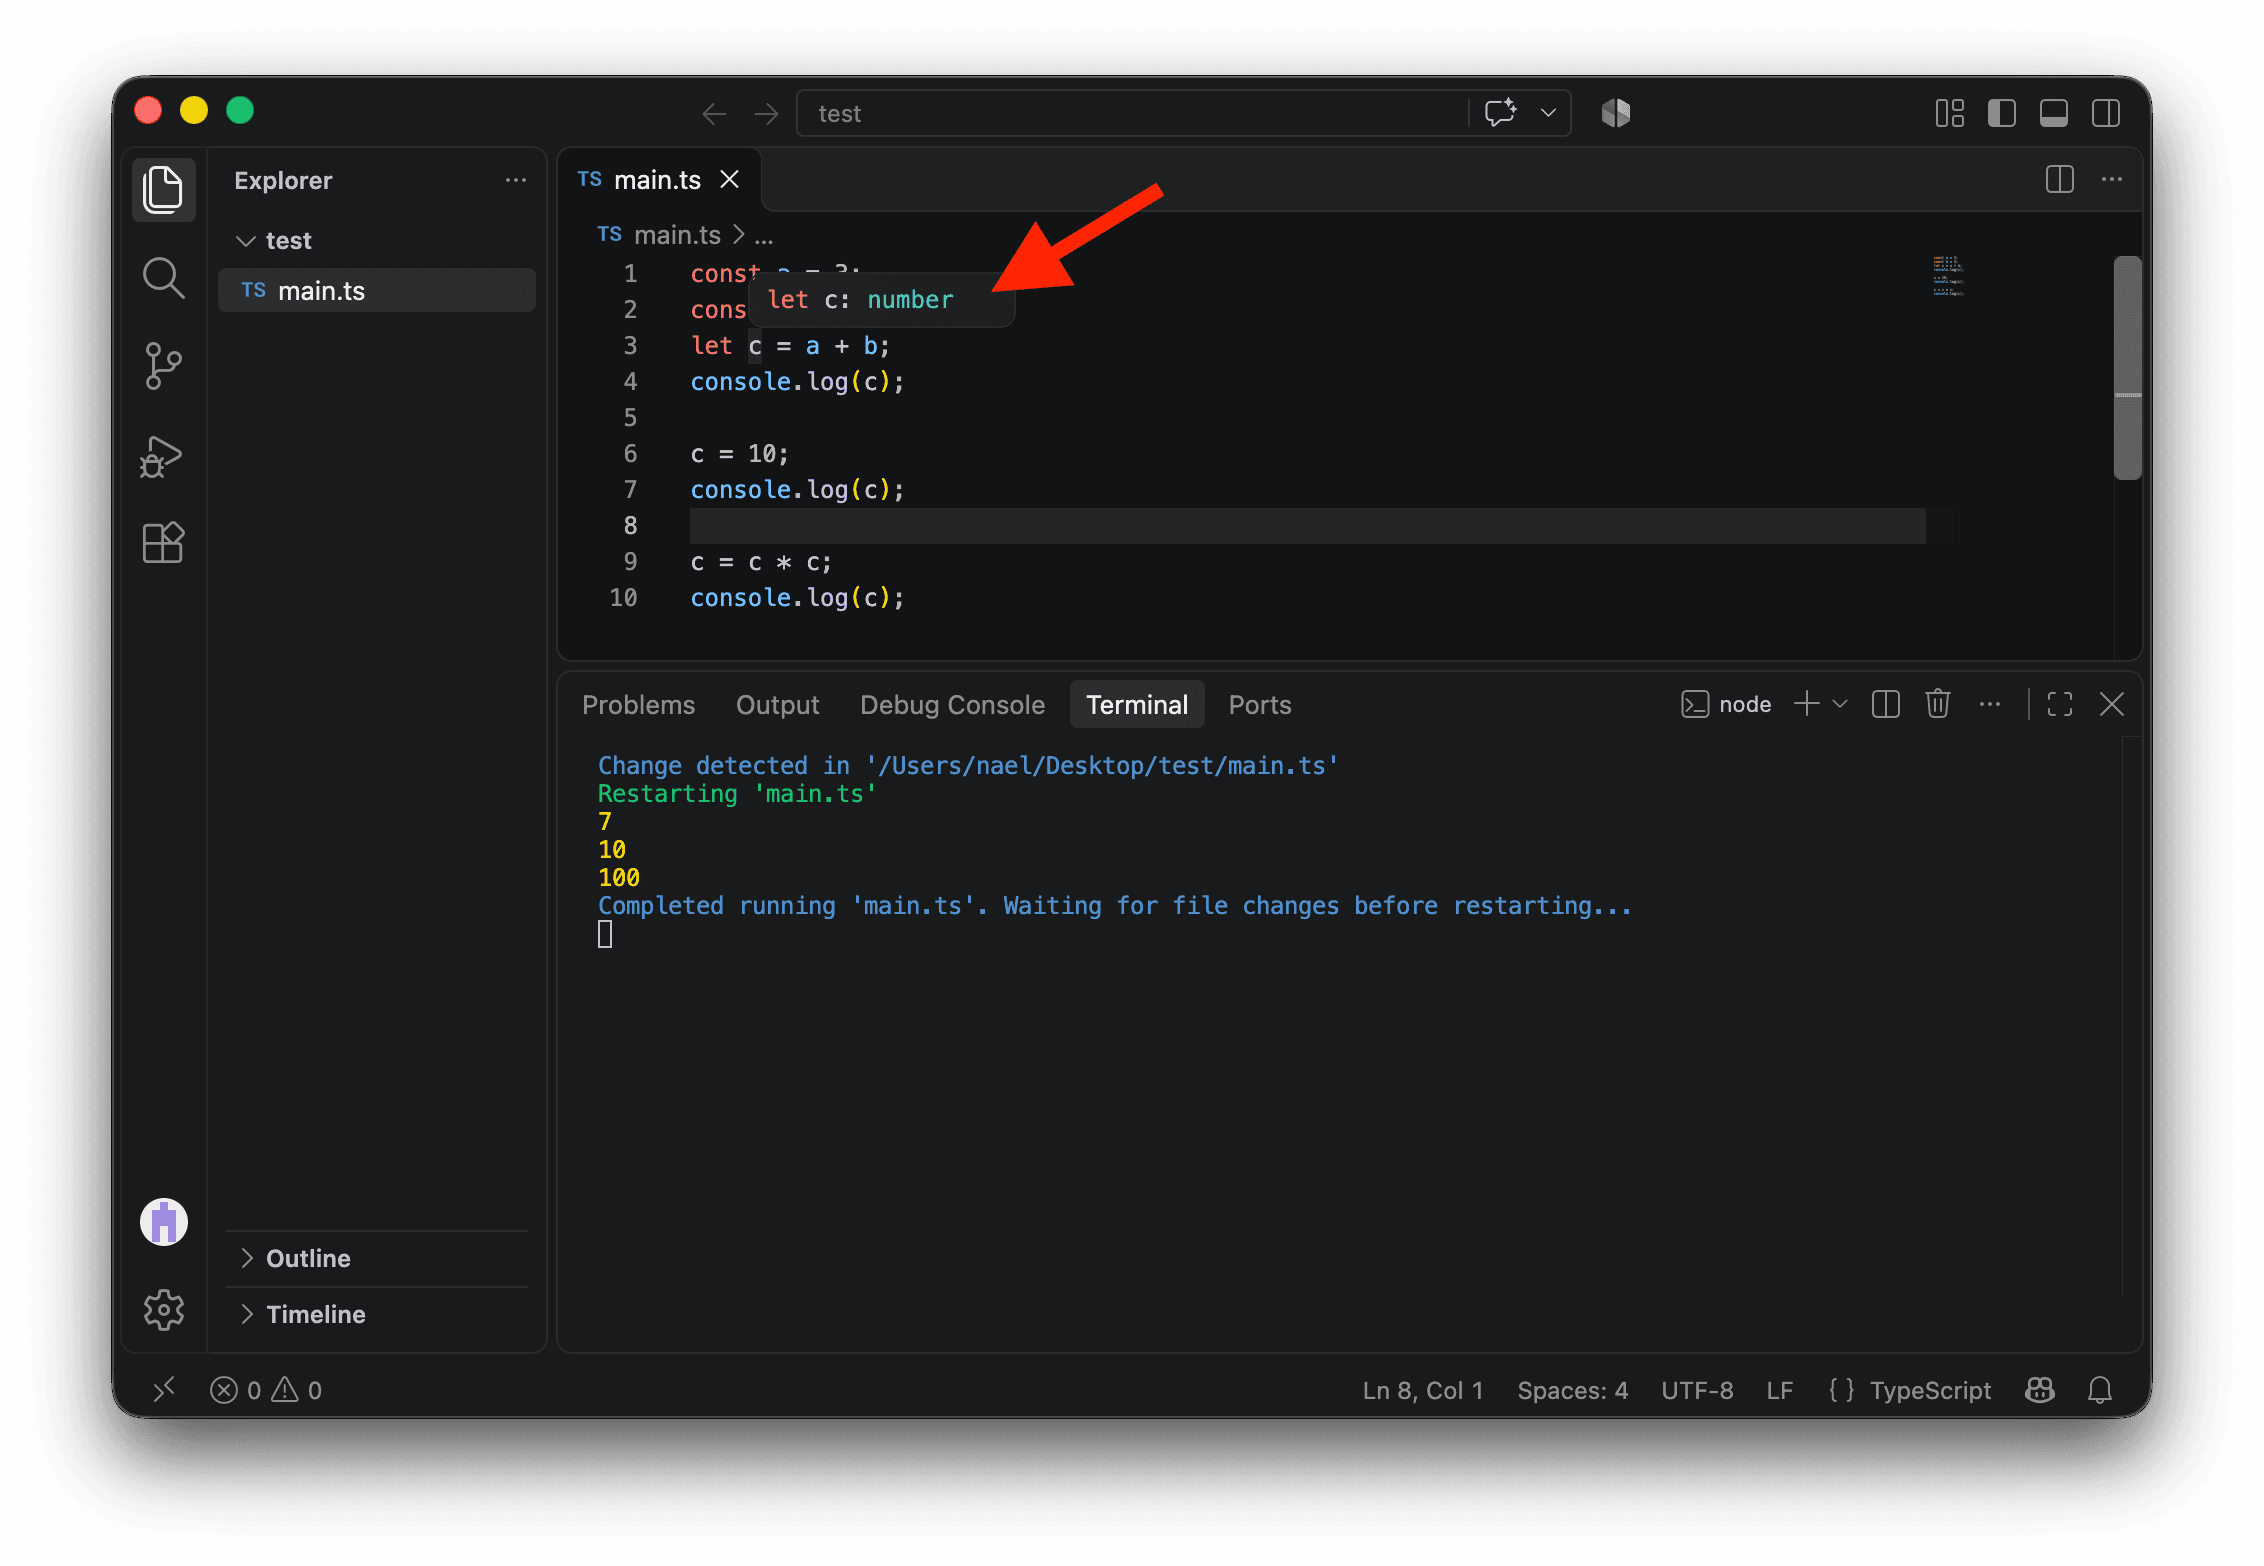
For example, if you hover over c right now, you’ll see that it has a type of number. This is because the sum of a and b is a number. The type here is inferred.
Now, let’s overwrite c with text on line 6. In TypeScript, text is called a string because it’s a string of characters. For your computer to recognize something as text, it needs to be wrapped in quotes.
const a = 3;
const b = 4;
let c = a + b;
console.log(c);

c = "Hey! What's up?";
console.log(c);

c = c * c;
console.log(c);
Update main.ts with this code and save the file.
VS Code flags a new type error: main.ts turns red again, and a red squiggly line appears under c.
Node.js still runs the code and logs 7, the greeting, then NaN, which means not a number. Trying to multiply this greeting by itself on line 9 doesn’t produce a number.
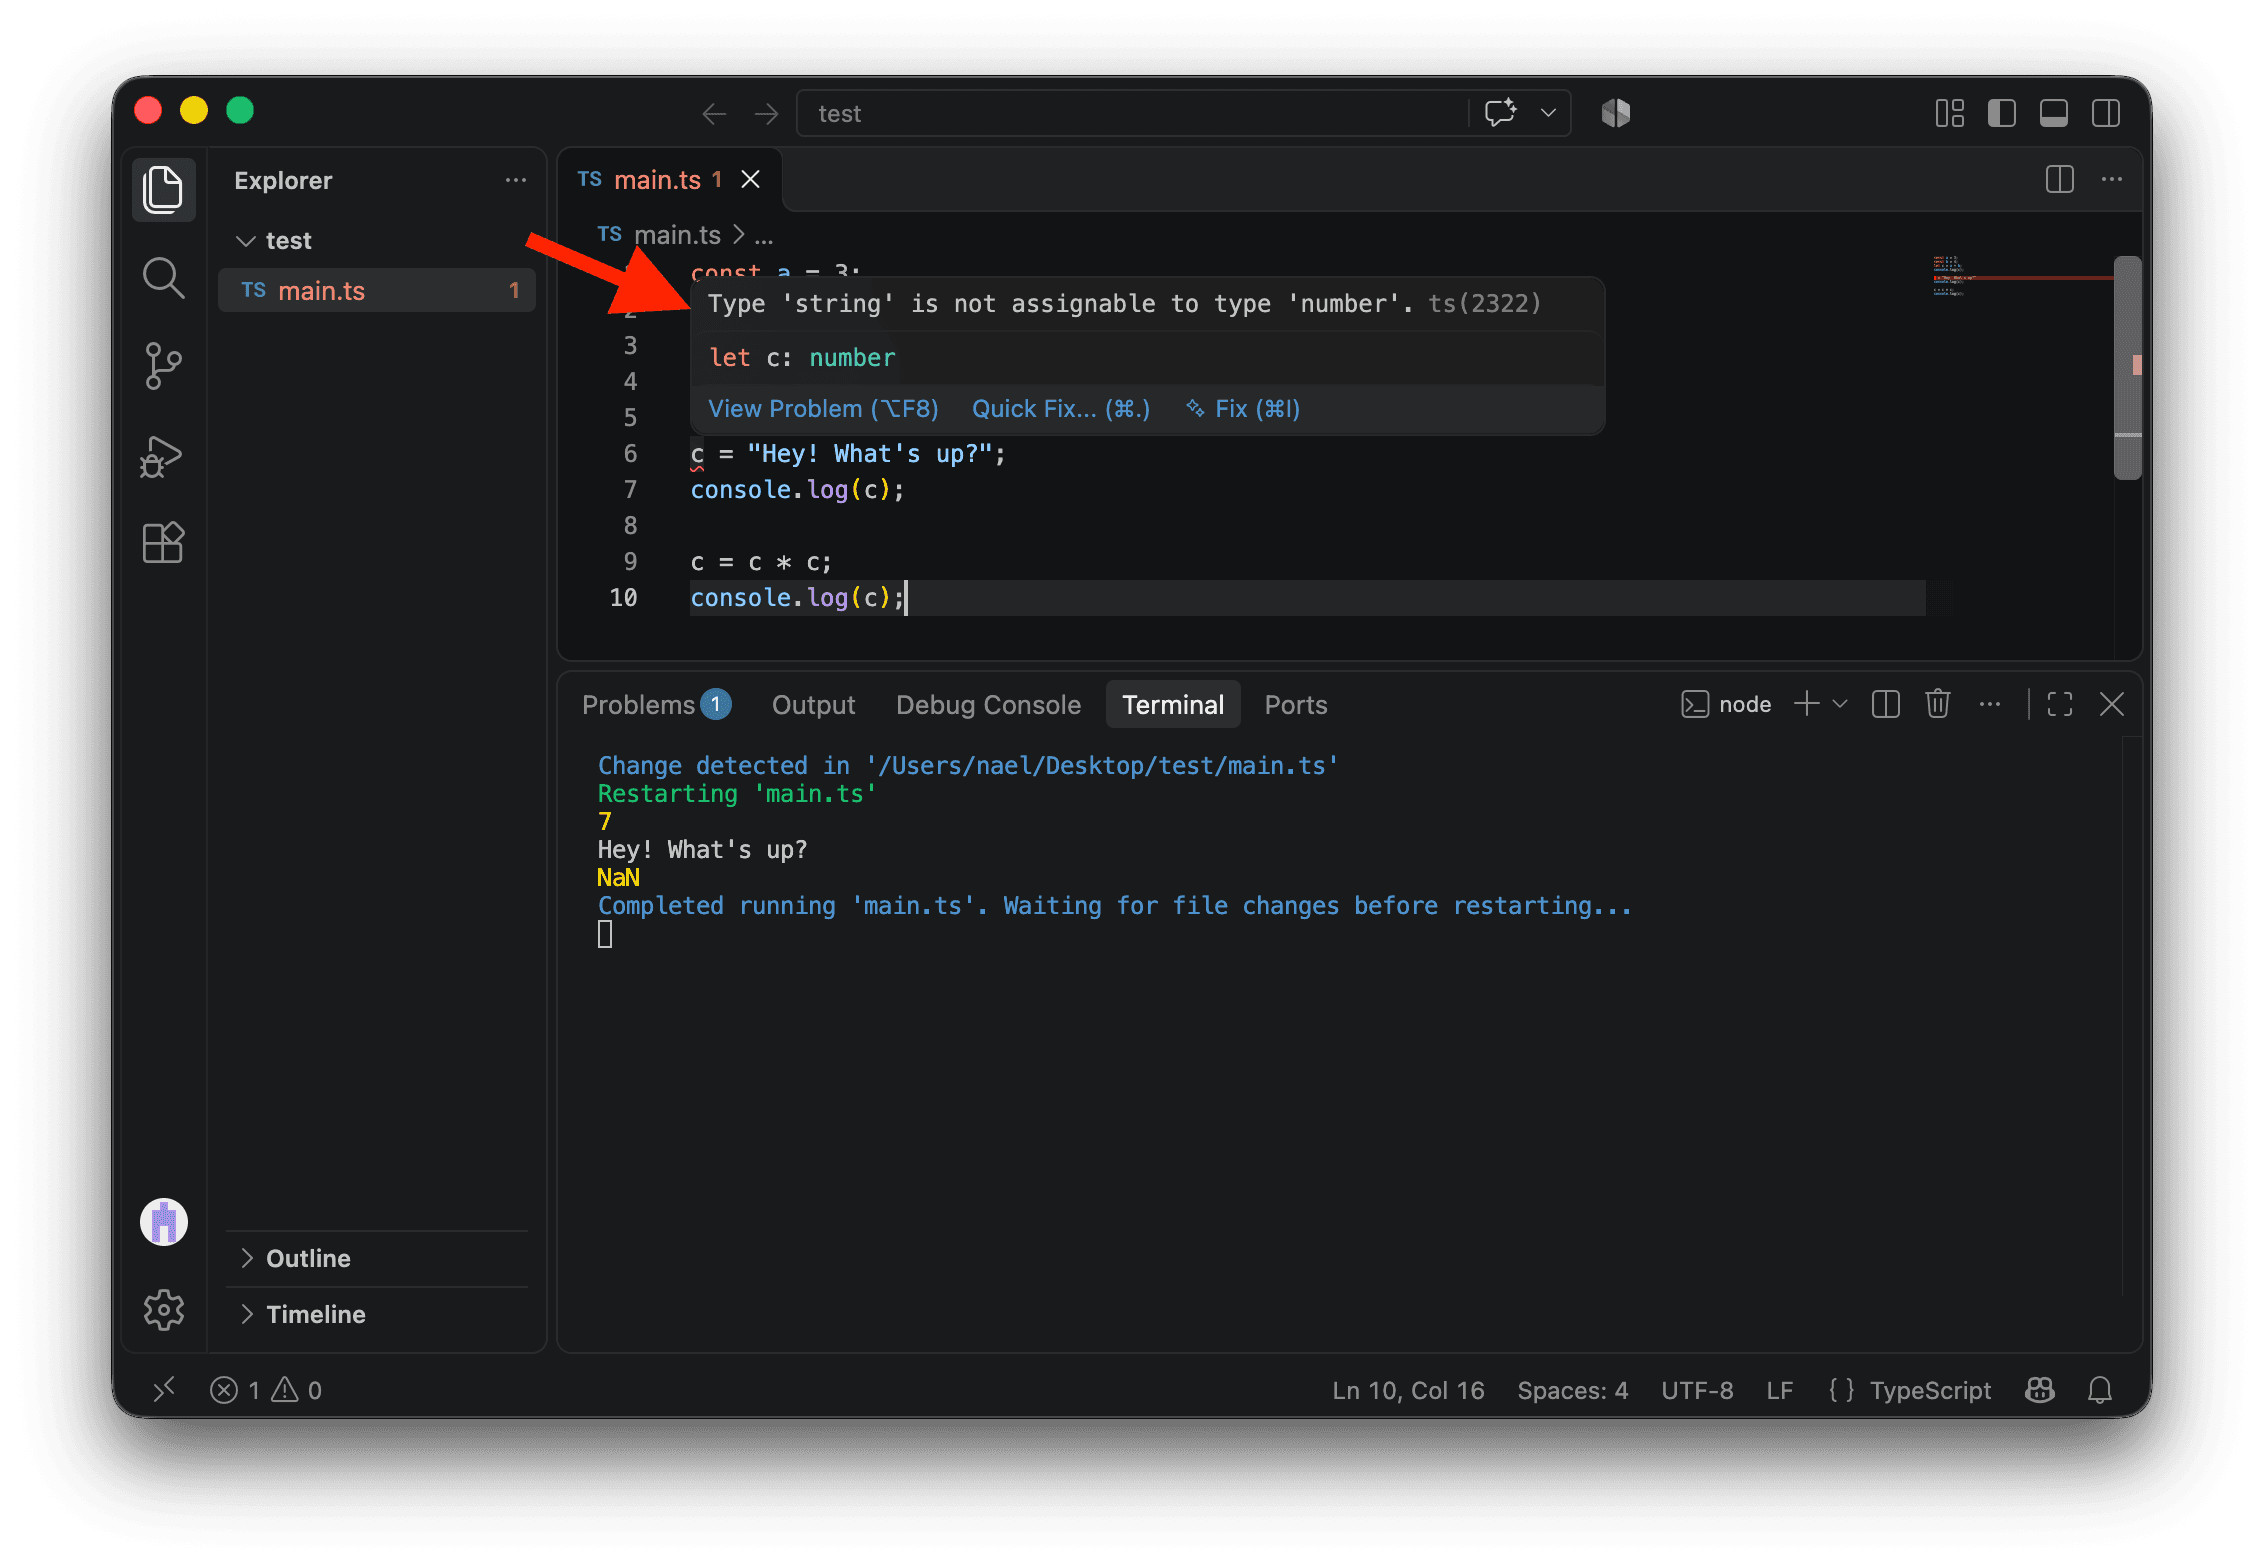
Hover over c to see the explanation: Type 'string' is not assignable to type 'number'. Because c started as a number, its type is number. Using let allows us to change its value, but that value must remain a number. This is a TypeScript rule.
These warnings and errors help prevent mistakes in longer scripts, where a value might be used again further down.
You may have noticed that the terminal shows no error, even though VS Code reports a type error. Node.js runs the code without checking TypeScript types; VS Code checks them as we write. In later lessons, we’ll make our terminal command check types before running the code, so type errors prevent the analysis from starting. This helps avoid mistakes in our results.
If you need to store "Hey! What's up?" in a variable, the solution is simple: create a new variable, as shown below. This keeps c available for our calculations.
const a = 3;
const b = 4;
let c = a + b;
console.log(c);

c = 10;
console.log(c);

c = c * c;
console.log(c);

const d = "Hey! What's up?";
console.log(d);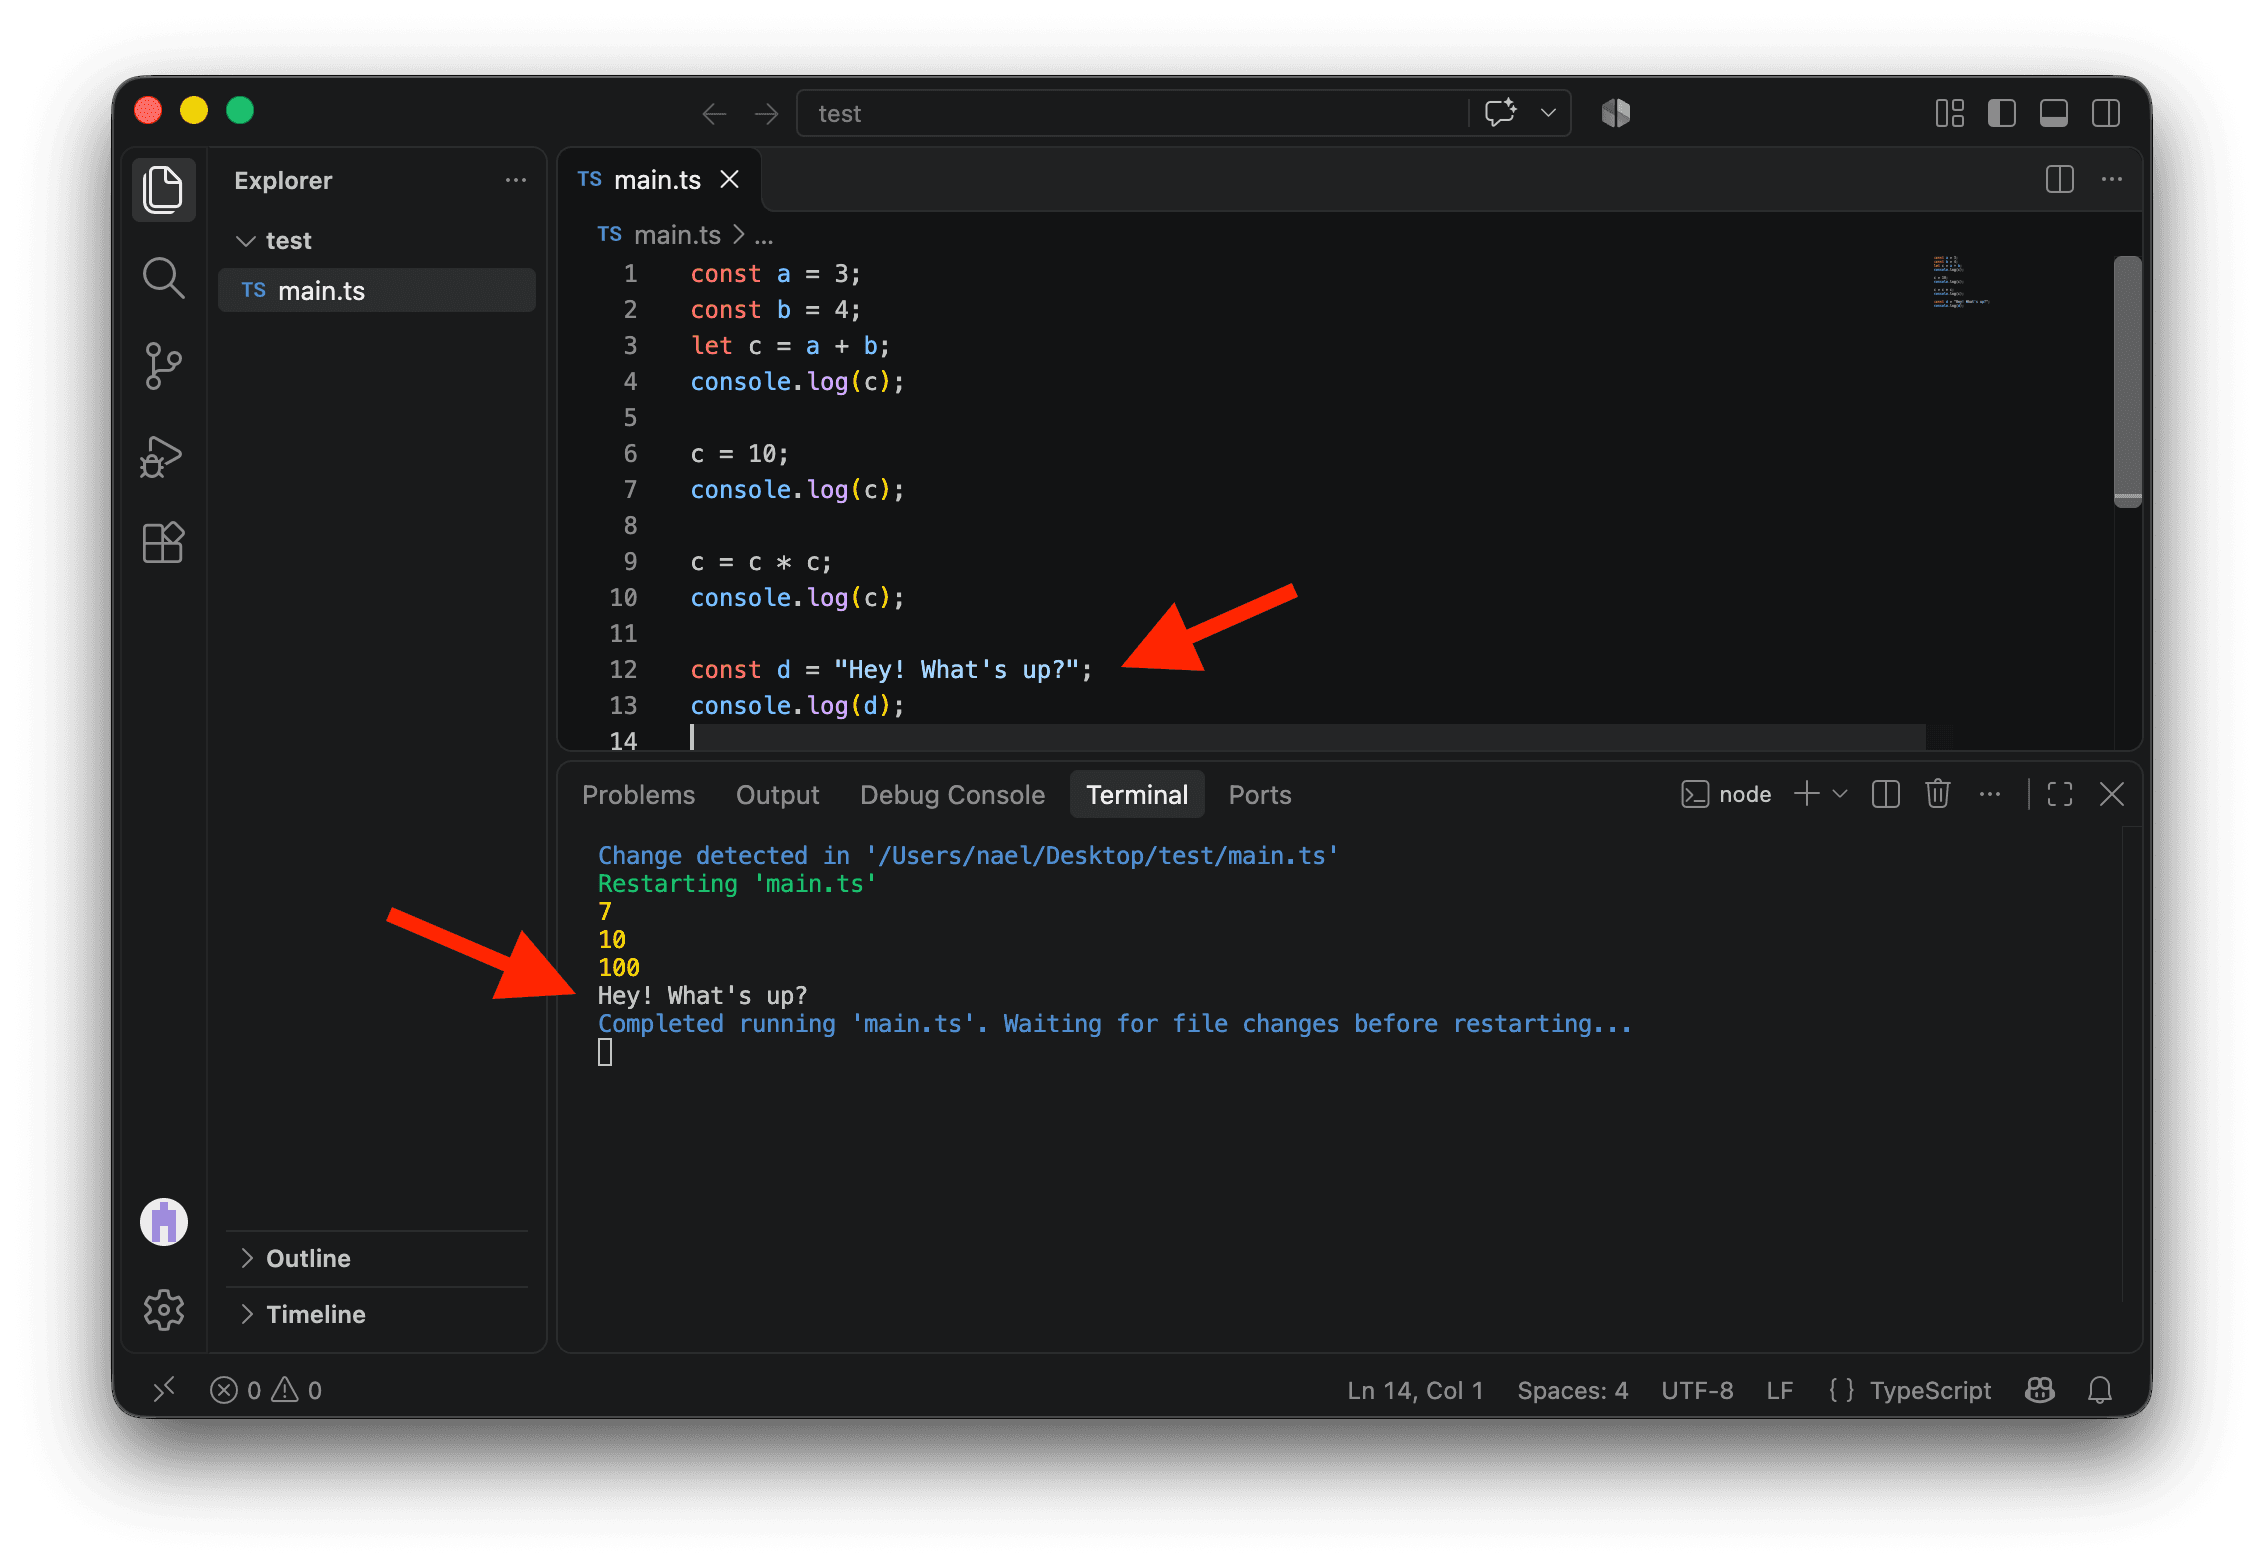
Conclusion
At this point, you might think, Why is this so complicated? Let me code whatever I want, stupid computer!
But trust me: this will save you from nasty bugs. As an experienced data and computational journalist, I’ve learned that the hard way. 😅
Using const will prevent you from accidentally overwriting important variables or data, and the types will ensure you are not mixing string, number, Date, or other data types that we will explore in the next lessons.
At the end of the day, you want valid results. You want to avoid publishing incorrect information at all costs. So, when you’re swearing at TypeScript errors, take a deep breath and repeat this out loud: It’s working for me, not against me!
While it might seem complicated right now, after a little bit of practice, it will all become natural. Trust me. 🙂
Let’s finish with a recap of our calculations, with comments explaining each step.
// We create constant variables containing numbers.
const a = 3;
const b = 4;

// c is inferred as a number because a and b are numbers.
// We use let so we can change its value later.
let c = a + b;
console.log(c);

// c is typed as a number, so we can only overwrite with numbers.
c = 10;
console.log(c);

// We can overwrite c by using c itself.
c = c * c;
console.log(c);

// For a different data type, we create a new variable.
const d = "Hey! What's up?";
console.log(d);To leave comments in your code, use // at the beginning of the line, like above. If you want to comment out multiple lines, wrap everything with /* at the beginning and */ at the end. Comments are ignored by your computer, so they are a great way to explain what your code does or to temporarily disable parts of your code.
If you don’t want to type the comment markers manually, place your cursor anywhere on a line or select several lines, then press CMD + / on Mac or CTRL + / on Windows in VS Code. Press the same shortcut again to uncomment them.